H Setting up an SQL API
Last updated: 2021-08-24 14:54:59
H.1 Introduction
This tutorial summarizes the steps for setting up an SQL API service as an alternative to the commercial CARTO service (Section 9.2.2). The SQL API exposes a PostGIS database through HTTP, which makes it possible to get subsets of spatial layers and display them on a Leaflet map (Chapters 9–11) or to submit drawn layers for permanent storage (Chapter 13).
Setting up the SQL API requires going through the following steps:
- Having a computer with a fixed IP address (Section H.2)
- Installing PostgreSQL and PostGIS (Section H.3)
- Loading data into the database (Section H.4)
- Adding a read-only database user (Section H.5)
- Installing Node.js and required modules (Section H.6)
- Testing the SQL API (Section H.8)
These instructions are more advanced than the material given in the main part of the book. If you are not familiar with the software components being used, be prepared for some amount of trial and error, which is part of the learning process.
H.2 Computer with fixed IP address
The first thing we need to take care of is having a computer with a fixed IP address, where the SQL API will run and clients will send their requests to. You can use a physical machine for this, though the simplest is to use a cloud service.
One of the simplest to use cloud solutions, which we are using in this tutorial is DigitalOcean. We can launch the smallest virtual machine, or droplet in DigitalOcean terminology, for as little as 5$ a month. The machine will have just 1 processor core and 1GB of RAM, which is enough for demonstration purposes (Figure H.1). The default operating system—Ubuntu 18.04 at the time of writing—can be used.
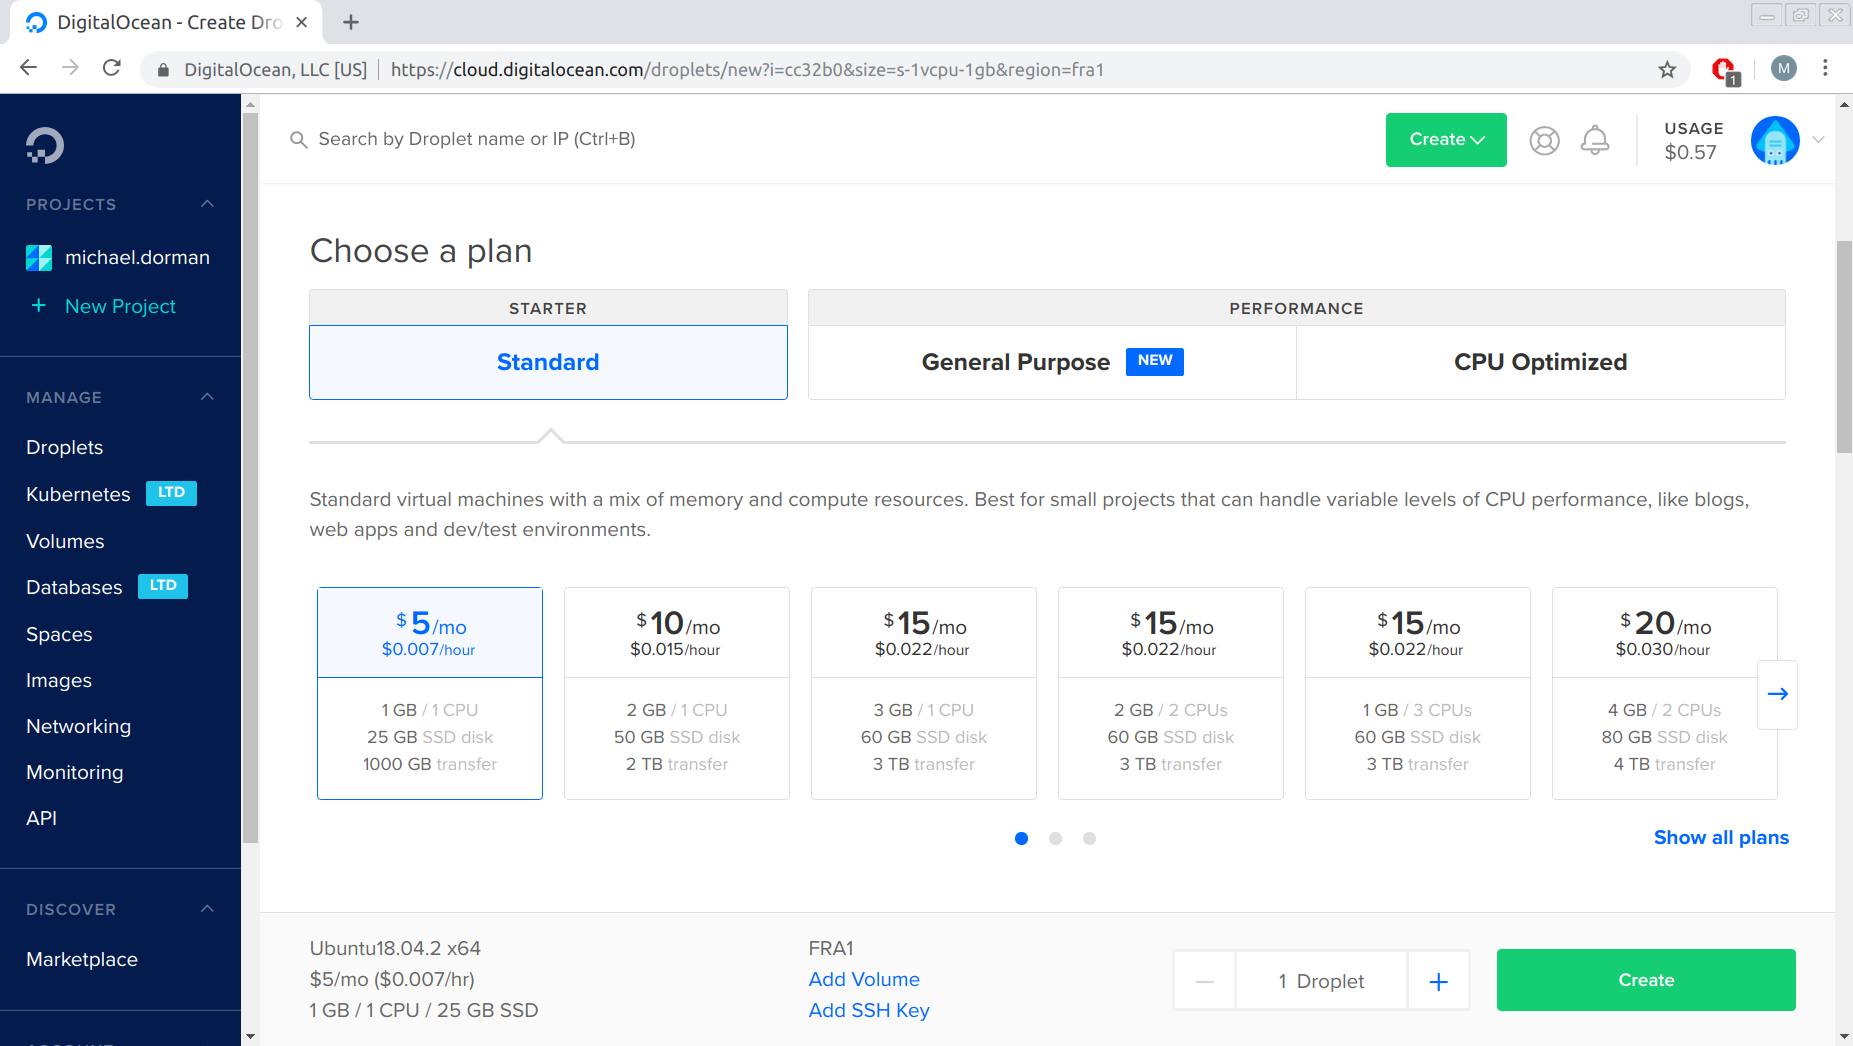
FIGURE H.1: Selecting DigitalOcean droplet size
Once the droplet is initiated, you need to write down its IP address. From now on you need to connect to the droplet through SSH to log into the computer and gain access to its command line interface. Everything from now on is done through the command line.
Connecting through SSH will look as follows:
ssh root@157.230.21.4where 157.230.21.4 is the droplet/server IP address. You will be prompted for a password which you can get by e-mail when resetting the password through the DigitalOcean web interface.
The first thing to do is create a new user other than root:
adduser michaelAnd add it to the sudo group:
usermod -aG sudo michaelAfterwards you can connect with the new user through SSH (Figure H.2):
ssh michael@157.230.21.4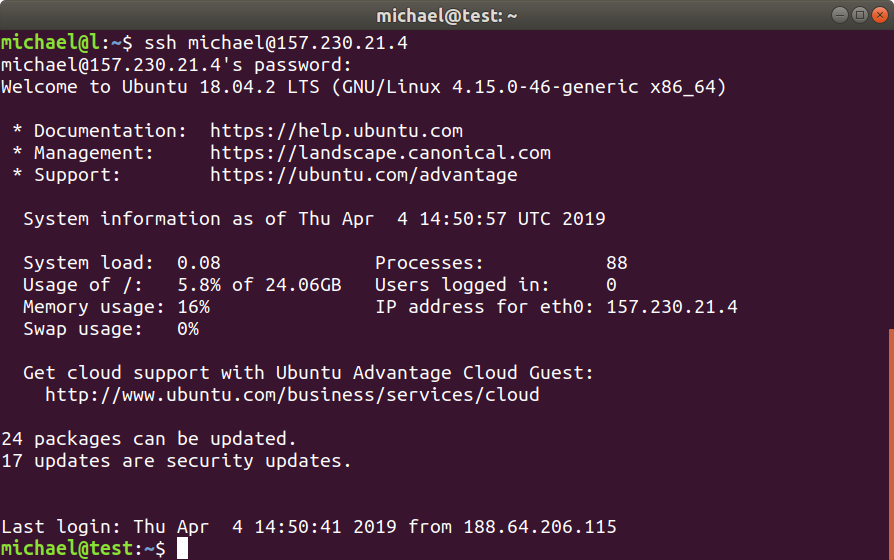
FIGURE H.2: PostGIS database query example
H.3 Installing PostgreSQL and PostGIS
The first step is to install the PostgreSQL database and enable the PostGIS extension. The instructions for installing PostgreSQL are based on the following tutorials for Ubuntu 20.04:
First, we install the required package:
sudo apt install postgresql postgresql-contrib
sudo apt install postgis postgresql-12-postgis-3
Log in to the database as postgres user:
sudo -u postgres psqlEnable “adminpack”:
CREATE EXTENSION adminpack;
\q
Log in once again:
sudo -u postgres psqlCreate a database named gisdb and enable extensions:
CREATE DATABASE gisdb;
\connect gisdb;

CREATE SCHEMA postgis;
ALTER DATABASE gisdb SET search_path=public, postgis, contrib;
CREATE EXTENSION postgis SCHEMA postgis;
\q
To enable remote connections to the database we need to do the following.
Log in:
sudo -u postgres psqlthen:
ALTER SYSTEM SET listen_addresses='*';
\q
Edit the pg_hba.conf file:
sudo nano /etc/postgresql/12/main/pg_hba.confScroll to the bottom of the pg_hba.conf file and add a line like this (right after the local rules):
hostssl all all 0.0.0.0/0 md5Press Ctrl+X to save your changes, then Y to write them to the file, and Enter to exit.
Restart PostgreSQL:
sudo service postgresql restart Log in:
sudo -u postgres psqlCreate a superuser:
CREATE ROLE mysuperuser LOGIN PASSWORD 'whatever' SUPERUSER;
\q
Log in as the new user:
psql -h localhost -U mysuperuser gisdbAnd setup PostGIS:
CREATE EXTENSION postgis;Try running a spatial query to see if PostGIS is operational:
SELECT
  (ST_SetSRID(ST_MakePoint(0, 0), 4326)::geography <->
  ST_SetSRID(ST_MakePoint(1, 0), 4326)::geography) / 1000
AS dist_km;
H.4 Loading data into the database
Now that the database is set, you need to add some data. There are many ways to do that. We will use R.
Assuming R is installed, open the R console on a different computer, the one with data you want to insert into the database:
RRead the plants.geojson file (download) and import it to the database from R using the following script:
library(sf)
library(RPostgreSQL)

# Connect
con = dbConnect(
  PostgreSQL(),
  dbname = "gisdb",
  host = "157.230.21.4",
  port = 5432,
  user = "mysuperuser",
  password = "whatever"
)

# Import table to database
dat = st_read("plants.geojson", stringsAsFactors = FALSE)
st_write(obj = dat, dsn = con, layer = "plants", overwrite = TRUE)

# Disconnect
dbDisconnect(con)
Let’s test if the database works properly.
Log in to the database:
psql -h localhost -U mysuperuser gisdbThen run the following query:
SELECT id, name_lat, ST_AsText(geometry) FROM plants LIMIT 5;If all works well, you should see a result such as the following (Figure H.3):
   id   |    name_lat    |         st_astext
--------+----------------+----------------------------
 321432 | Iris haynei    | POINT(35.679761 32.770133)
 321433 | Iris haynei    | POINT(35.654005 32.741372)
 321456 | Iris atrofusca | POINT(35.193367 31.44711)
 321457 | Iris atrofusca | POINT(35.189142 31.514754)
 321459 | Iris vartanii  | POINT(35.139696 31.474149)
(5 rows)
FIGURE H.3: PostGIS database query example
H.5 Adding a read-only database user
To make sure users cannot do harmful changes in the database through the SQL API, it is useful to create a read-only user.
Log in to database:
psql -h localhost -U mysuperuser gisdbCREATE ROLE readonlyuser WITH LOGIN PASSWORD 'whatever2'
NOSUPERUSER INHERIT NOCREATEDB NOCREATEROLE NOREPLICATION VALID UNTIL 'infinity';Assign permission to this read only user:
GRANT CONNECT ON DATABASE gisdb TO readonlyuser;
GRANT USAGE ON SCHEMA public TO readonlyuser;
GRANT SELECT ON ALL TABLES IN SCHEMA public TO readonlyuser;
GRANT SELECT ON ALL SEQUENCES IN SCHEMA public TO readonlyuser;
Possibly need to update search path:
select e.extname,n.*
from pg_extension e, pg_namespace n
where e.extnamespace = n.oid and e.extname='postgis';
show search_path;ALTER USER readonlyuser SET search_path TO "$user", public, postgis;And/or move the postgis extension to schema postgis:
ALTER DATABASE gisdb SET "search_path" = public,postgis;

ALTER EXTENSION postgis SET SCHEMA postgis;

UPDATE pg_extension SET extrelocatable = TRUE WHERE extname = 'postgis';

ALTER EXTENSION postgis SET SCHEMA public;

GRANT USAGE ON SCHEMA postgis TO readonlyuser;

\q
Now, connect as the new user:
psql -h localhost -U readonlyuser gisdband try:
DROP TABLE plants;If all works well, you should see an error:
ERROR: must be owner of relation plantsAlso try:
DELETE FROM plants WHERE name_lat='Iris haynei';And you should see:
ERROR: permission denied for relation plantsH.6 Installing Node.js and required modules
Next, we need to install Node.js. The DigitalOcean tutorial can be consulted.
Run the following commands to get the required packages:
sudo apt update
sudo apt install nodejs
sudo apt install npm
Check that Node.js is installed with the following command, which should print the installed version:
nodejs -vWe will use a Node.js script to create an SQL API for our database.
This is based on the postgis-preview example.
Create a new folder for your server app. Run the following commands to initialize the server and download the required dependencies:
mkdir node
cd node
npm init
npm install express --save
npm install pg-promise --save
npm install dbgeo --saveNow, inside the directory create a new file named index.js with:
nano index.jsThen paste the following Node.js script for the SQL API inside it:
// Dependencies
let express = require("express"),
    pgp = require("pg-promise")(),
    dbgeo = require("dbgeo");

// CORS
let allowCrossDomain = function(req, res, next) {
    res.header("Access-Control-Allow-Origin", "*");
    res.header("Access-Control-Allow-Methods", "GET");
    res.header("Access-Control-Allow-Headers", "Content-Type");
    next();
}

// Create express app and prepare db connection
let app = express();
let port = 4000;
let connectionString = "postgres://readonlyuser:whatever2@localhost:5432/gisdb";
let db = pgp(connectionString);

app.use(allowCrossDomain);

// Expose sql endpoint, grab query as URL parameter and send it to the database
app.get("/sql", function (req, res) {
    let sql = req.query.q;
    console.log("Executing SQL: " + sql);

    //query using pg-promise
    db.any(sql)
        .then(function (data) { //use dbgeo to convert WKB from PostGIS into topojson
            return dbGeoParse(data);
        })
        .then(function (data) {
            res.send(data);
        })
        .catch(function (err) { //send the error message if the query didn't work
            let msg = err.message || err;
            console.log("ERROR:", msg);
            res.send({
                error: msg
            });
        });
});

// Parse to GeoJSON
function dbGeoParse(data) {
    return new Promise(function (resolve, reject) {
        dbgeo.parse(data, {
            outputFormat: "geojson"
        }, function (err, result) {
            if(err) {
                reject(err);
            } else {
                resolve(result);
            }
        });
    });
}

// Start the server
let server = app.listen(port, "0.0.0.0", function () {
  let host = server.address().address;
  let port = server.address().port;
  console.log("App listening at http://%s:%s", host, port);
});
While still inside the directory, type the following command to start the server:
node index.jsH.7 Creating a service
To run the server indefinitely, forcing startup when errors are raised or when the server reboots, you need to create a service. This can be done using systemd, which is installed by default on Ubuntu. First create a service file, such as index.service, with contents such as follows:
[Service]
ExecStart=/usr/bin/node /home/michael/index.js
Restart=always
StandardOutput=syslog
StandardError=syslog
SyslogIdentifier=index
User=michael
Group=nogroup
Environment=NODE_ENV=production
WorkingDirectory=/home/michael/

[Install]
WantedBy=multi-user.target
Note that ExecStart is composed of the node executable and the path to the application .js file.
Copy the index.service file to /etc/systemd/system/:
sudo cp index.service /etc/systemd/system/Then, start the service:
systemctl enable index
systemctl start index
You can check the service status with:
systemctl status indexand print the logs with:
journalctl -u indexH.8 Testing the SQL API
Enter the following URL in your browser:
http://157.230.21.4:4000/sql?q=select id, name_lat, geometry AS geom from plants limit 2If the SQL API is working properly, you should see the following GeoJSON content in the response (Figure H.4). At the same time you should see a message in the Node.js server log (Figure H.5).
{
    "type": "FeatureCollection",
    "features": [
        {
            "type": "Feature",
            "geometry": {
                "type": "Point",
                "coordinates": [
                    35.679761,
                    32.770133
                ]
            },
            "properties": {
                "id": 321432,
                "name_lat": "Iris haynei"
            }
        },
        {
            "type": "Feature",
            "geometry": {
                "type": "Point",
                "coordinates": [
                    35.654005,
                    32.741372
                ]
            },
            "properties": {
                "id": 321433,
                "name_lat": "Iris haynei"
            }
        }
    ]
}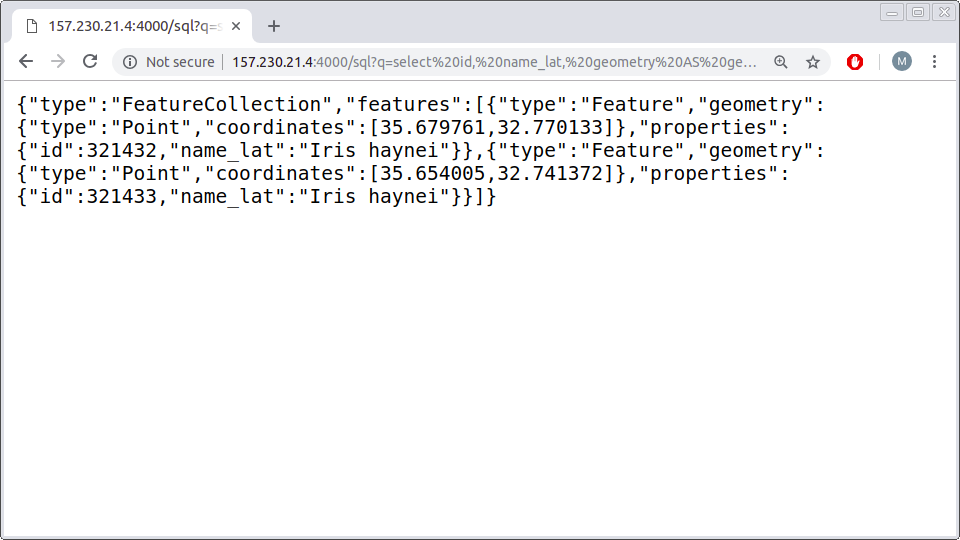
FIGURE H.4: Testing the SQL API in the browser
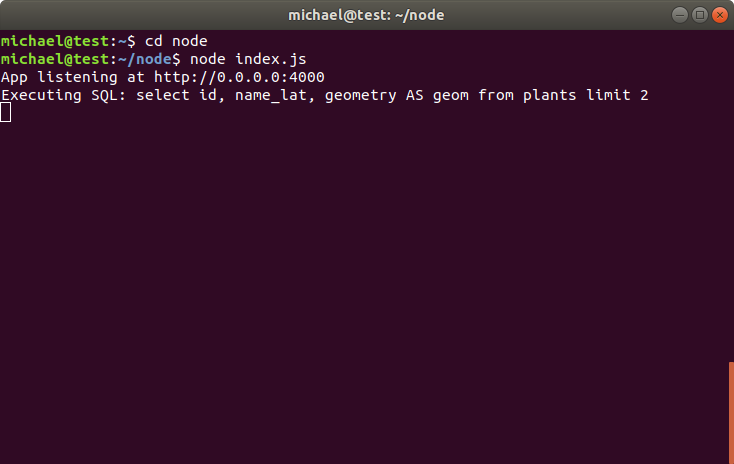
FIGURE H.5: Node.js server log
This setup is sufficient to reproduce the examples from Chapters 9–11, where the SQL API is being used to query the plants table from within a Leaflet map in several ways.
For reproducing the examples in Chapter 13, you need to create the additional table beer_sheva as instructed in Section 13.6.1, with few modifications:
CREATE TABLE beer_sheva(
    geom geometry,
    description text,
    name text
);

GRANT INSERT (geom, description, name)
  ON beer_sheva
  TO readonlyuser;

GRANT SELECT ON beer_sheva TO readonlyuser;