Chapter 4 JavaScript Interactivity
4.1 Introduction
In Chapters 1–2, we mentioned that JavaScript is primarily used to control the interactive behavior of web pages. However, in Chapter 3 we introduced the JavaScript language “in isolation”: none of the JavaScript expressions we executed in the console had any effect on the contents of the web page where they were run. Indeed, how can we link JavaScript code with page contents, to interactively modify the web page? This is precisely the subject of the current chapter—employing JavaScript to query and modify web page content. As we will see, the mechanism which makes the link possible is the Document Object Model (DOM).
4.2 The Document Object Model (DOM)
When a web browser loads an HTML document, it displays (renders) the contents of that document on the screen, possibly styled according to CSS styling rules. But that’s not all the web browser does with the tags, attributes, and text contents of the HTML document. The browser also creates and memorizes a “model” of that page’s HTML (Figure 4.1). In other words, the browser remembers the HTML tags, their attributes, and the order in which they appear in the file. This representation of the page is called the Document Object Model (DOM).
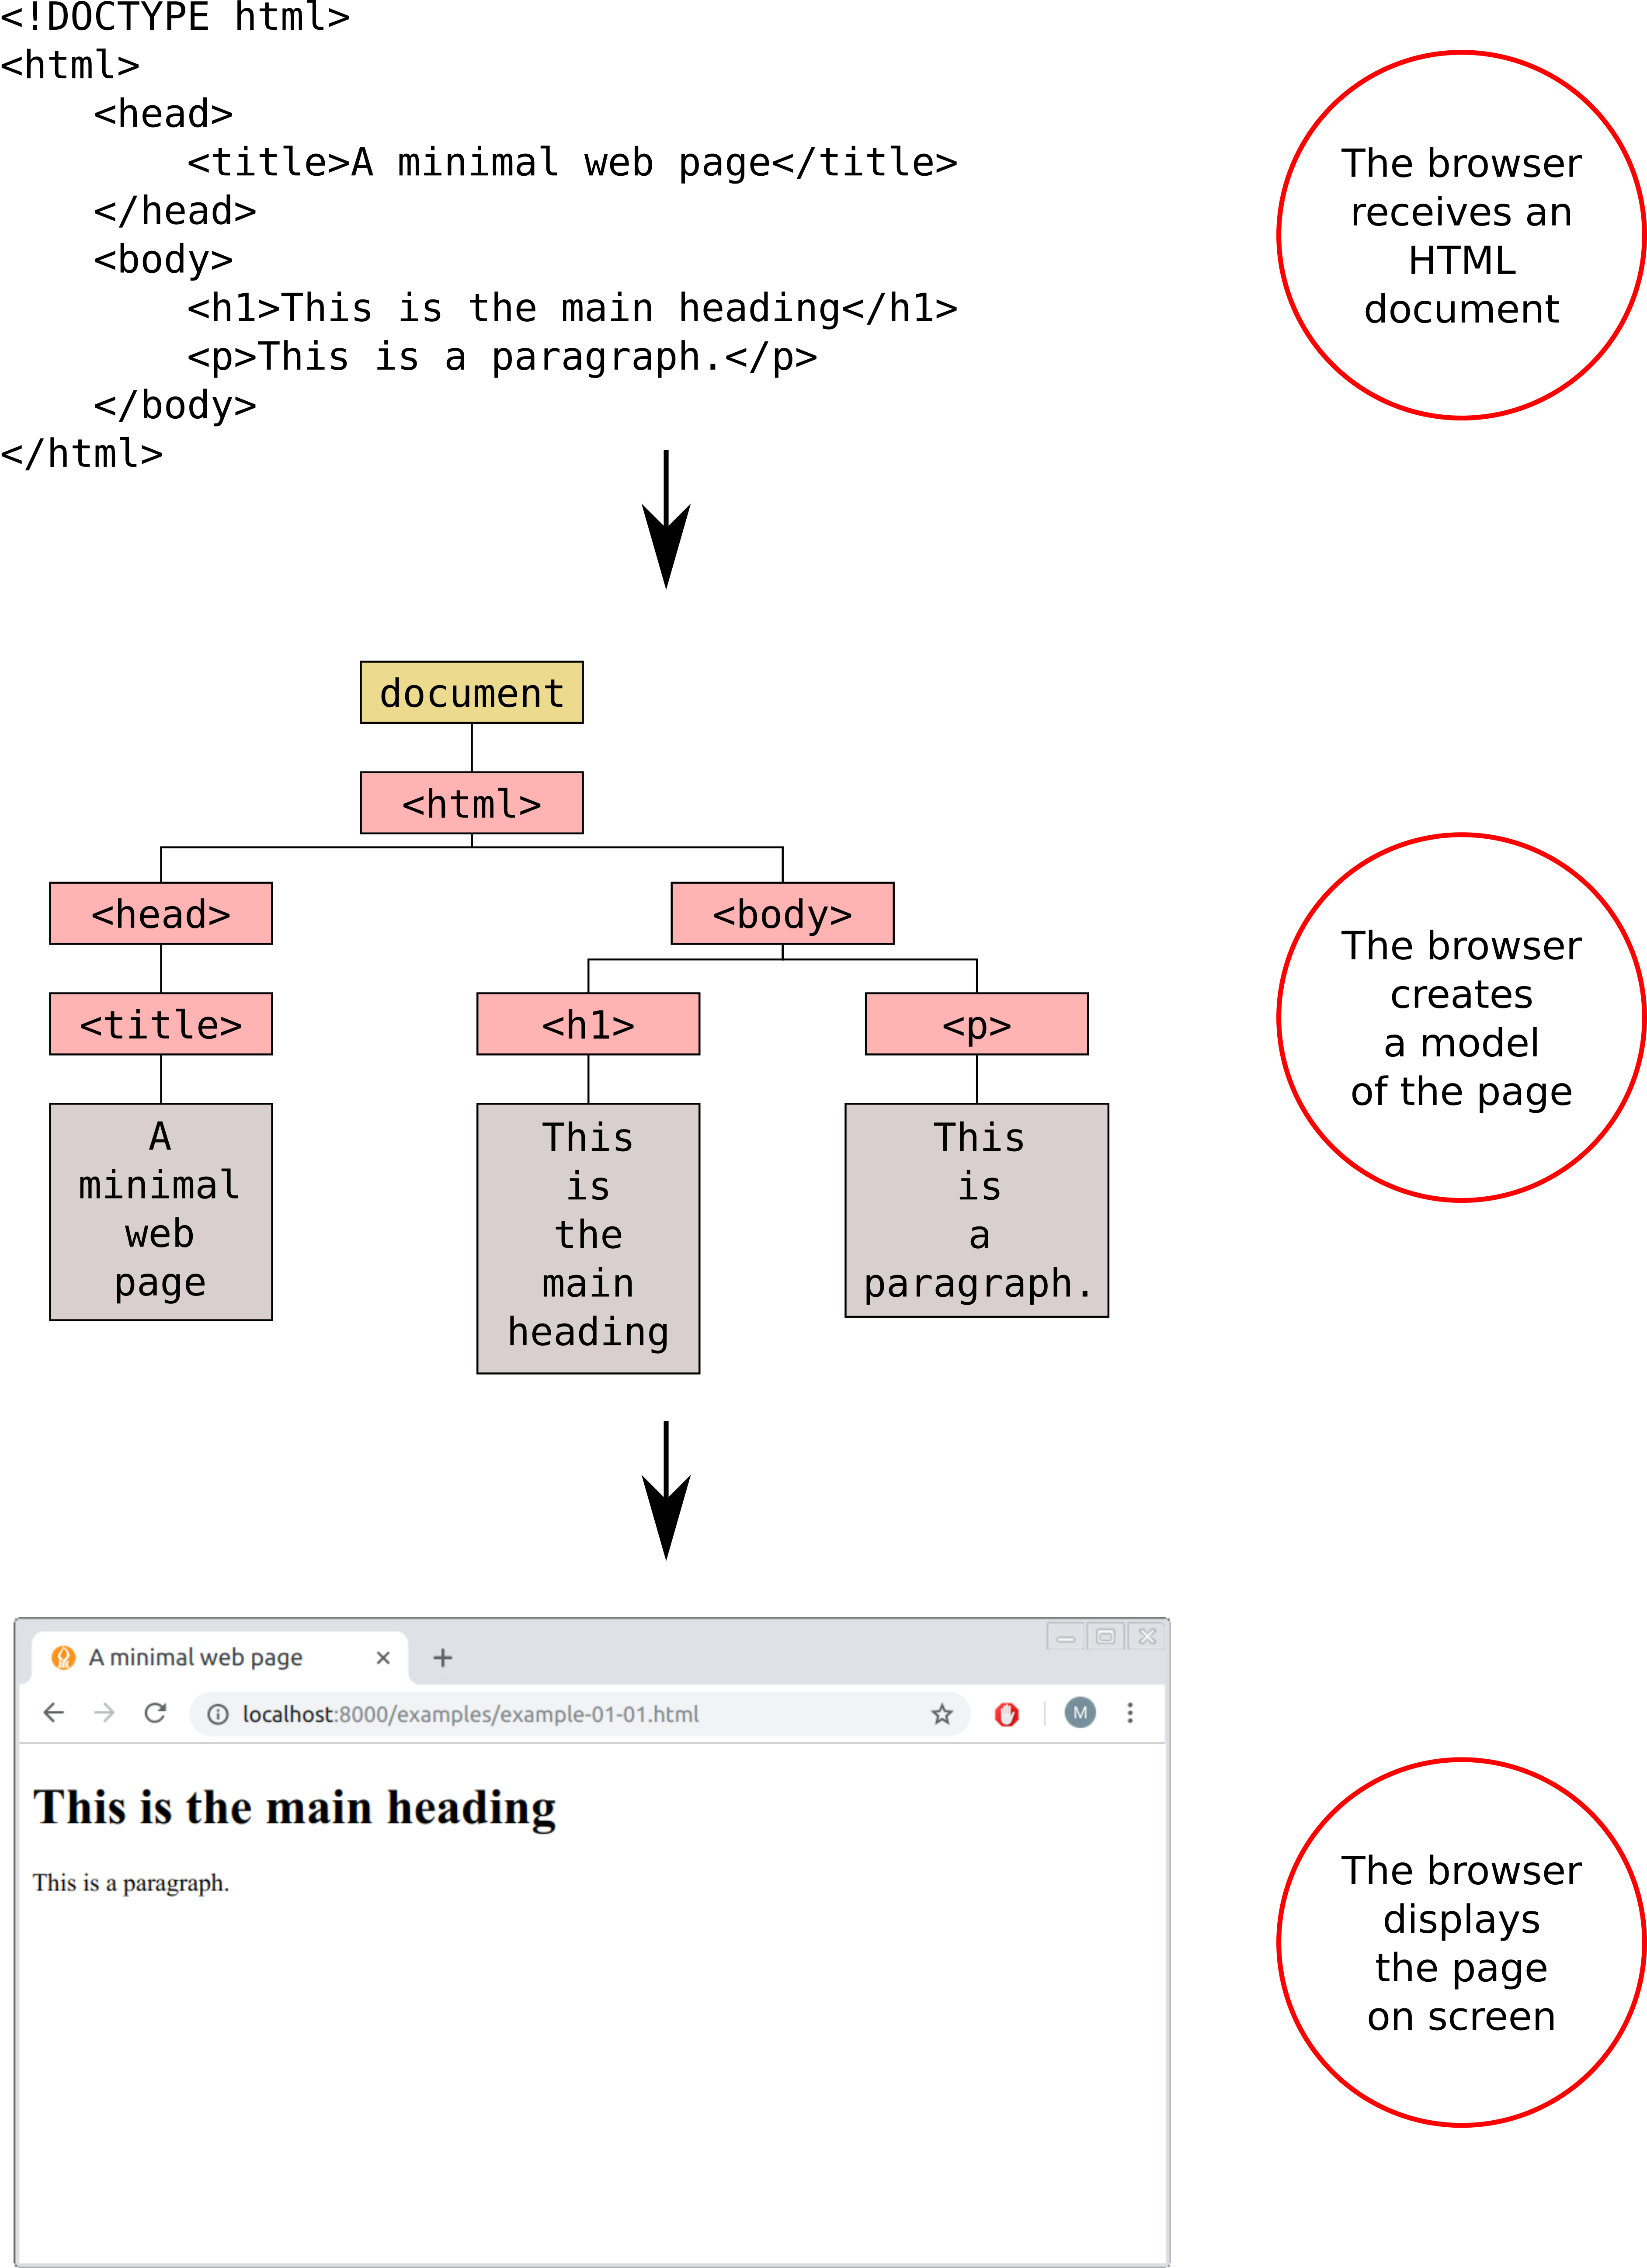
FIGURE 4.1: The Document Object Model (DOM) is a representation of an HTML document, constructed by the browser on page load
The DOM is sometimes referred to as an Application Programming Interface (API) for accessing HTML documents with JavaScript. An API is a general term for methods of communication between software components. The DOM can be considered an API, since it bridges between JavaScript code and page contents displayed in the browser. The DOM basically provides the information and tools necessary to navigate through, or make changes or additions, to the HTML on the page. The DOM itself isn’t actually JavaScript—it’s a standard from the World Wide Web Consortium (W3C) that most browser manufacturers have adopted and added to their browsers.
4.3 Accessing and modifying elements
4.3.1 Overview
All of the properties and methods of the DOM, available for manipulating web pages, are organized into objects which are accessible through JavaScript code. Two of the most important objects are:
- The
windowobject, which represents the browser window, i.e., the global environment - The
documentobject, which represents the document itself33
Using the properties and methods of the window and document objects, we are able to access document element contents or their display settings, and also dynamically adjust them. For example, the document object has a property named title, referring to the text within the <title> element—the page title (Section 1.6.2.1). We can access document.title, to get a string with page title, or modify page title, by assigning a new string to document.title.
- Open the browser and browse to any web page you like.
- Open the JavaScript console (Section 3.4) and try typing
document.titleandwindow.location.href.- Check the type of returned values, using the
typeofoperator (Section 3.6.4).- Try assigning a new string into
document.title. The new title should appear on top of the browser window!- Go to any page (other than https://www.google.com) and type
window.location="https://www.google.com"into the console. What do you think has happened?
4.3.2 Accessing elements
The document.title property was just an example, referring to the specific <title> element. We need a more general method if we want to be able to locate, and modify, any element in our document. The document object indeed contains several methods for finding elements in the DOM. These methods are called DOM selectors, or DOM queries. The following two expressions are examples of DOM selectors.
Both expressions employ methods of the document object:
- The first selector uses the
.getElementByIdmethod to select an individual element with a specific ID,id="firstParagraph". - The second selector uses the
.getElementsByClassNamemethod to select all elements with a specific class,class="important".
4.3.3 Modifying elements
The result of a DOM query is a reference to an element, or set of elements, in the DOM. That reference can be used to update the contents or behavior of the element(s). For example, the innerHTML property of a DOM element refers to the HTML code of that element. The following expression uses the innerHTML property to modify the HTML content of the element which has id="firstParagraph", replacing any previous HTML code inside that element with <b>Hello!</b>.
It is important to understand that the HTML source code and the DOM are two separate entities. While the HTML source code sent to the browser is constant, the DOM, which is initially constructed from the HTML source code (Figure 4.1), can be dynamically altered using JavaScript code. As long as no JavaScript code that modifies the DOM is being run, the DOM and the HTML source code are identical. However, when JavaScript code does modify the DOM, the DOM changes and the displayed content in the browser window changes accordingly.
The current DOM state can be examined, for example, using the Elements tab of the developer tools (in Chrome). The HTML source code can be shown with Ctrl+U (in Chrome), as we have already discussed in Section 1.3. Again, the source code remains exactly the same as initially sent from the server, no matter what happens on the page, while the DOM may be modified by JavaScript code and thus may change. This means that the HTML source code does not necessarily match the DOM once any JavaScript code was executed.
- While running the examples in this chapter, you can compare the HTML source code and the DOM to see how the DOM changes in response to executed JavaScript code, while the HTML source code remains the same as initially loaded.
4.3.4 Event listeners
Sometimes we want to change the DOM at once, for example on page load. In other cases, however, we want to change the DOM dynamically, in response to user actions on the page, such as clicking on a button. This is where the DOM events come into play. Each and every thing that happens to a web page is called an event. Web browsers are programmed to recognize various events, including user actions such as:
- Mouse movement and clicks
- Pressing on the keyboard
- Re-sizing the browser window
An event represents the precise moment when something happens inside the browser. This is sometimes referred to as the event being fired. There are different types of events, depending on the type of action taking place. For example, when you click a mouse, at the precise moment you release the mouse button the web browser signals that a "click" event has just occurred. In fact, web browsers fire several separate events whenever you click the mouse button. First, as soon as you press the mouse button, the "mousedown" event fires; then, when you let go of the button, the "mouseup" event fires; and finally, the "click" event fires.
To make your web page interactive, you need to write code that runs and does something useful in response to the appropriate type of event occurring on the appropriate element(s). This type of binded code is known as an event listener, or an event handler. For example, we may wish to set an event listener which responds to user click on an interactive map by adding a marker in the clicked location (Section 11.2.2). In such case, we need to bind an event listener:
- to the interactive map object,
- with a function for adding a marker,
- which is executed in response to a mouse
"click"event.
A mouse click is just one example, out of many predefined event types that the browser can detect. Table 4.1 lists some commonly used event types.
| Type | Event | Description |
|---|---|---|
| Mouse | "click" |
Click |
"dblclick" |
Double-click | |
"mousedown" |
Mouse button pressed | |
"mouseup" |
Mouse button released | |
"mouseover" |
Mouse cursor moves into element | |
"mouseout" |
Mouse cursor leaves element | |
"mousemove" |
Mouse moved | |
"drag" |
Element being dragged | |
| Keyboard | "input" |
Value changed in <input> or <textarea> |
"keydown" |
Key pressed | |
"keypress" |
Key pressed (character keys only) | |
"keyup" |
Key released | |
| Focus and Blur | "focus" |
Element gains focus (e.g., typing inside <input>) |
"blur" |
Element loses focus | |
| Forms | "submit" |
Form submitted |
"change" |
Form changed | |
| Document/Window | "load" |
Page finished loading |
"unload" |
Page unloading (new page requested) | |
"error" |
JavaScript error encountered | |
"resize" |
Browser window resized | |
"scroll" |
User scrolls the page |
In this book, we will mostly use the "click", "mouseover", "mouseout", and "drag" events, all from the Mouse events category, as well as "change" from the Forms category (Table 4.1). However, it is important to be aware of the other possibilities, such as events related to window resize or scrolling, or keyboard key presses.
4.3.5 Hello example
The next two examples demonstrate the idea of event listeners using plain JavaScript. We will not go into details in terms of syntax, though, because starting from Section 4.4 we will be using an easier way of doing the same things with the jQuery JavaScript library.
Consider the following HTML code of example-04-01.html:
<!DOCTYPE html>
<html>
    <head>
        <title>Hello JavaScript</title>
    </head>
    <body>
        <h2>JavaScript</h2>
        <p id="demo">What can JavaScript do?</p>
        <input type="button" value="Click Me!" id="change_text">
        <script>
            function hello() {
                document
                    .getElementById("demo")
                    .innerHTML =
                        "JavaScript can change page contents!";
            }
            document
                .getElementById("change_text")
                .addEventListener("click", hello);
        </script>
    </body>
</html>
In this example, we have a web page with an <h2> heading (without an ID), as well as two other elements with an ID:
- A
<p>element withid="demo" - An
<input>button element withid="change_text"
In the end of the <body>, we have a <script> element containing JavaScript code (Section 1.6.3). Since the <script> element is in the end of the <body>, it will be executed by the browser after the HTML code is loaded and processed. Let’s look at the last line in the JavaScript code:
The above expression does several things:
- Selects the element which has
id="change_text"(the button), using thedocument.getElementByIdmethod (Section 4.3.2) - Binds an event listener to it, using the
.addEventListenermethod - The event listener specifies that when the element is clicked (i.e., the
"click"event is fired), thehellofunction will be executed
What does the hello function do? According to its definition at the beginning of the <script>, we see that it has no parameters and just one expression:
function hello() {
    document
        .getElementById("demo")
        .innerHTML = "JavaScript can change page contents!";
}
What the hello function does is:
- Selects the element with
id="demo"(the paragraph), again using thedocument.getElementByIdmethod - Replaces its HTML contents with
"JavaScript can change page contents!", by assigning the new contents into theinnerHTMLproperty (Section 4.3.3)
Note that in this example the expression inside the hello function is incidentally split into several (three) lines, to fit on the page. However, new-line symbols and repeated spaces are ignored by the JavaScript interpreter. You can imagine the characters being merged back into a long single-line expression, then executed. In other words, the computer still sees a single expression here, where we assign a string into the .innerHTML property of an element selected using document.getElementById.
The way that example-04-01.html appears in the browser is shown in Figure 4.2.
FIGURE 4.2: example-04-01.html (Click to view this example on its own)
- Open
example-04-01.htmlin the browser, then open the Elements tab in Developer Tools.- Click the button that says “Click me!” (Figure 4.2), and observe how the paragraph contents are being modified.
- Note how the affected part of the DOM is momentarily highlighted each time the button is pressed.
4.3.6 Poles example
The second example example-04-02.html is slightly more complex, but the principle is exactly the same as in example-04-01.html:
<!DOCTYPE html>
<html>
    <head>
        <title>Earth poles</title>
    </head>
    <body>
        <h2>Earth Poles Viewer</h2>
        <img id="myImage" src="images/north.svg"><br>
        <input type="button" value="North Pole" id="north">
        <input type="button" value="South Pole" id="south">
        <script>
            function showNorth() {
                document
                    .getElementById("myImage")
                    .src = "images/north.svg";
            }
            function showSouth() {
                document
                    .getElementById("myImage")
                    .src = "images/south.svg";
            }
            document
                .getElementById("north")
                .addEventListener("click", showNorth);
            document
                .getElementById("south")
                .addEventListener("click", showSouth);
        </script>
    </body>
</html>
In this example, we have two buttons, and we add two event listeners: one for the North pole button and one for the South pole button (Figure 4.3). Both event listeners change the src attribute of the <img> element on the web page. The North pole button sets src='images/north.svg', while the South pole button sets src='images/south.svg'. The resulting effect is that the displayed globe is switched from viewing the North pole or the South pole34.
Note that the images loaded in this example—north.svg and south.svg—are in a format called Scalable Vector Graphics (SVG), having the .svg file extension. SVG is an open standard vector image format. It is well supported by web browsers and commonly used to display vector graphics on web pages.
The result of example-04-02.html is shown in Figure 4.3.
FIGURE 4.3: example-04-02.html (Click to view this example on its own)
4.4 What is jQuery?
So far we introduced the DOM (Section 4.2), and saw how it can be used to (dynamically) modify page contents (Section 4.3). In the remainder of this chapter, we will learn about the jQuery library which simplifies these (and other) types of common tasks.
A JavaScript library is a collection of JavaScript code, which allows for easier development of JavaScript-based applications. There are a lot of JavaScript libraries that simplify common tasks (e.g., DOM manipulation) or specialized tasks (e.g., web mapping), to make life easier for web developers. Often, you will be working with a library that is already written, instead of “reinventing the wheel” and writing your own JavaScript code for every single task.
jQuery is a JavaScript library that simplifies tasks related to interaction with the DOM, such as selecting elements and binding event listeners—like we did in the last two examples. Since this type of task is very common in JavaScript code, jQuery is currently the most widely used JavaScript library, by a large margin.
![]()
The main functionality of jQuery consists of:
- Finding elements using CSS-style selectors
- Doing something with those elements, using jQuery methods
In the following Sections 4.5–4.10, we are going to introduce these two concepts while writing alternative implementations of the “Hello” (Sections 4.3.5) and “Poles” (Section 4.3.6) examples. In the new versions of the examples (Sections 4.9–4.10), we will be using jQuery, instead of plain JavaScript, for selecting elements and for binding event listeners.
In addition to its main functionality, jQuery has functions and methods to simplify other types of tasks in web development. For example, the $.each function (Section 4.12) simplifies the task of iterating over arrays and objects. In later chapters, we will learn about a technique for loading content into our web page called Ajax, which is also simplified using jQuery (Section 7.7).
4.5 Including the jQuery library
4.5.1 Including a library
Before using any object, function, or method from jQuery, the library needs to be included in our web page. Practically, this means that the jQuery script is being run on page load, defining jQuery objects, functions, and methods, which you can then use in the subsequent scripts that are executed on that page.
To include the jQuery library—or any other script for that matter—we need to place a <script> element referring to that script in our HTML document. Scripts for loading libraries are commonly placed inside the <head> of our document. Placing a <script> in the <head> means that the script is loaded before anything visible (i.e., the <body>) is loaded. This can be safer and easier for maintenance, yet with some performance implications. Namely, page load is being halted until the <scripts> elements have been processed. Since the jQuery script is very small (~90 kB), there is no noticeable delay for downloading and processing it, so we can safely place it in the <head>.
As mentioned in Section 1.6.3, when using the <script> element to load an external script file, we use the src attribute to specify file location. The location specified by src can be either a path to a local file, or a URL of a remote file hosted elsewhere on the web.
4.5.2 Loading a local script
When loading a script from a local file, we need to have an actual copy of the file on our server (more on that in Section 5.5). Basically, we need to download the jQuery code file, e.g., from the download section on the official jQuery website, and save it along with our HTML file. In case the jQuery script we downloaded is named jquery.js, the first few lines of the document may look as follows:
4.5.3 Loading a remote script
When loading a script from a remote file, hosted on the web in some location other than our own computer, we need to provide the file URL. A reliable option is to use a Content Delivery Network (CDN), such as the one provided by Google. A CDN is a series of servers designed to serve static files very quickly. In case we are loading the jQuery library from Google’s CDN, the first few lines of the document may look as follows:
The src attribute value is truncated with [...] to save space. Here is the complete URL that needs to go into the src attribute value:
https://ajax.googleapis.com/ajax/libs/jquery/3.4.1/jquery.min.js
- Browse to the above URL to view the jQuery library contents. You can also download the file by clicking Save as… to view it in a text editor instead of the browser.
- You will note that the code is formatted in a strange way, as if the entire content is in a single line, with very few space and new line characters. This makes it hard for us to read the code.
- Can you guess what is the reason for this type of formatting?
Whether we refer to a local file or to a remote file, the jQuery code will be loaded and processed by the browser, which means we can use its functions and methods in other scripts on that page.
4.6 Selecting elements
As mentioned above, the main functionality of jQuery involves selecting elements and then doing something with them. With jQuery, we usually select elements using CSS-style selectors. To make a selection, we use the $ function defined in the jQuery library. The $ function can be invoked with a single parameter, the selector.
Most of the time, we can apply just the three basic CSS selector types (which we covered in Section 2.4) to get the selection we need. Using these selectors, we target elements based on their type, ID, or class. For example:
$("a");         // Selects all <a> elements
$("#choices");  // Selects the element with id="choices"
$(".submenu");  // Selects all elements with class="submenu"
The result of each of these expressions is a jQuery object, which contains a reference to the selected DOM element(s) along with methods for doing something with the selection. For example, the jQuery object has methods for modifying the contents of all selected elements (Sections 4.7) or adding event listeners to them (Section 4.8), as discussed below.
It should be noted that jQuery also lets you use a wide variety of advanced CSS selectors to accurately pinpoint the specific elements we need inside complex HTML documents. We will not be needing such selectors in this book35.
4.7 Operating on selection
4.7.1 Overview
jQuery objects are associated with numerous methods for acting on the selected elements, from simply replacing HTML (Section 4.7.2), to precisely positioning new HTML in relation to a selected element (Sections 4.7.4–4.7.5), to completely removing elements and content from the page. Table 4.2 lists some of the most useful jQuery methods36 for operating on selected elements, which we cover in the following Sections 4.7.2–4.7.7.
| Type | Method | Description |
|---|---|---|
| Getting/Changing content | .html |
Get or set content as HTML |
.text |
Get or set content as text | |
| Adding content | .append |
Add content before closing tag |
.prepend |
Add content after opening tag | |
| Attributes and values | .attr |
Get or set attribute value |
.val |
Get or set value of input element |
The following small web page (example-04-03.html) will be used to demonstrate selecting elements and acting on selection, using jQuery.
<!DOCTYPE html>
<html>
    <head>
        <title>jQuery operating on selection</title>
        <script src="js/jquery.js"></script>
    </head>
    <body>
        <h1 id="header">List</h1>
        <h2>Buy groceries</h2>
        <ul>
            <li id="one" class="hot"><i>fresh</i> figs</li>
            <li id="two" class="hot">pine nuts</li>
            <li id="three" class="hot">honey</li>
            <li id="four">balsamic vinegar</li>
        </ul>
        <h2>Comments</h2>
        <input type="text" id="test3" value="Mickey Mouse">
    </body>
</html>
Figure 4.4 shows how example-04-03.html appears in the browser.
FIGURE 4.4: example-04-03.html (Click to view this example on its own)
You can open example-04-03.html in the browser and run the expressions shown in Sections 4.7.2–4.7.7 (below) in the console, to see their immediate effect on page content.
4.7.2 .html
The .html method can be used to read the current HTML code inside an element, or to replace it with some other HTML code. To retrieve the HTML currently inside the selection, just add .html() after the jQuery selection. For example, you can run the following command in the console where example-04-03.html is loaded:
This should give the following output:
In this example, we used a selector to locate the element with id="one", then used the .html method on the selection to get its HTML contents. Keep in mind that if the selection contains more than one element, only the contents of the first element is returned by the .html method. For example, the following expression returns the same value as the previous one, because the first <li> element on the page is also the one having id="one":
If you supply a string as an argument to .html, you replace the current HTML contents inside the selection. This can be seen as the jQuery alternative for assignment into the .innerHTML property using plain JavaScript (Section 4.3.3):
In case the selection contains more than one element, the HTML contents of all elements is set to the new value. For example, the following expression will replace the contents of all list items on the page:
- Open
example-04-03.htmland run the above expression for changing the contents of the first<li>element in the console.- Compare the HTML source code (Ctrl+U) and the DOM (Elements tab in the developer tools).
- Which one reflects the above change and why? (Hint: see Section 4.3.3.)
4.7.3 .text
The .text method works like .html, but it does not accept HTML tags. It is therefore useful when you want to replace the text within an element. For example:
- What do you think will happen if you pass text that contains HTML tags–such as
<b>pineapple</b>–to the.textmethod?- Try it out in the console to check your answer.
4.7.4 .append
The .append and .prepend methods add new content inside the selected elements. The .append method adds HTML as the last child element of the selected element(s). For example, say you select a <div> element, but instead of replacing the contents of the <div>, you just want to add some content before the closing </div> tag. The .append method, when applied to the <div>, does just that.
The .append method is a great way to add an item to the end of a bulleted (<ul>) or numbered (<ol>) list. For example, the following expression adds a new list item at the end of our <ul> element in example-04-03.html:
An example of a web page that uses .append for adding new list items will be given in Section 4.13.
4.7.5 .prepend
The .prepend method is like .append, but adds HTML content as the first child of the selected element(s), that is, directly after the opening tag. For example, we can use .prepend to add a new item at the beginning, rather than the end, of our list:
4.7.6 .attr
The .attr method can get or set the value of a specified attribute. To get the value of an attribute of the first element in our selection, we specify the name of the attribute in the parentheses. For example, the following expression gets the class attribute value of the element that has id="one":
To modify the value of an attribute for all elements in our selection, we specify both the attribute name and the new value. For example, the following expression sets the class attribute of all <li> elements to "cold":
4.7.7 .val
The .val method gets or sets the current value of input elements, such as <input> or <select> (Section 1.6.12). Note that .attr("value") (Section 4.7.6) is not the same as .val(). The former method gives the attribute value in the DOM, such as the initial value set in HTML code. The latter gives the real-time value set by the user, such as currently entered text in a text box, which is not reflected in the DOM.
For example, the web page we are experimenting with (example-04-03.html) contains the following <input> element:
The following expression gets the current value of that element, which is equal to "Mickey Mouse" unless the user interacted with the text area and typed something else:
If you modify the contents of the text input area, and run the above expression again, you will see the new, currently entered text. The .attr("value") method, on the other hand, will still show the original value ("Mickey Mouse").
You may already have guessed that passing an argument to .val can be used to modify the current input value. The following expression sets the input value to "Donald Duck", replacing the previous value of "Mickey Mouse", or whatever else that was typed into the text area:
We will get back to another practical example using .val and <input> elements in Section 4.14.
4.8 Binding event listeners
In addition to querying and modifying contents, we can also bind event listeners to the elements in our selection. At the beginning of this chapter, we binded event listeners using plain JavaScript (Sections 4.3.4–4.3.6). In this section, we will do the same thing (in a simpler way) using jQuery.
jQuery-selection objects contain the .on method, which can be used to add event listeners to all elements in the respective selection. Similarly to the .addEventListener method in plain JavaScript which we saw above (Section 4.3.5), the jQuery .on method accepts two arguments:
- A specification of the event type(s) (Table 4.1) that are being listened to, such as
"click" - A function, which is executed each time the event fires
For example, to bind a "click" event listener to all paragraphs on a page, you can use the following expression:
where myFunction is a function that defines what should happen each time the user clicks on a <p> element.
The function we pass to the event listener does not need to be a predefined named function, such as myFunction. You can also use an anonymous function (Section 3.8). For example, here is another version of the above event listener definition, this time using an anonymous function:
It is often convenient to add multiple event listeners to the same element selection, in order to trigger different responses for different events. In our next example (example-04-04.html), two event listeners37 are binded to the id="p1" paragraph. The first event listener responds to the "mouseover" event (mouse cursor entering the element), printing "You entered p1!" in the console. The second event listener responds to the "mouseout" event (mouse cursor leaving the element), printing "You left p1!" in the console.
$("#p1")
    .on("mouseover", function() { console.log("You entered p1!"); })
    .on("mouseout", function() { console.log("You left p1!"); });
As a result, the phrases the "You entered p1!" or "You left p1!" are interchangeably printed in the console whenever the user moves the mouse into the paragraph or out of the paragraph. The small web page implementing the above pair of event listeners (example-04-04.html) is shown in Figure 4.5.
FIGURE 4.5: example-04-04.html (Click to view this example on its own)
- Open
example-04-04.htmlin the browser, and open the JavaScript console.- Move the mouse cursor over the paragraph and check out the messages being printed in the console (Figure 4.5).
- Try modifying the source code of this example so that the messages are displayed on the web page itself, instead of the console. (Hint: add another paragraph for the messages in the HTML code, and use the
.textmethod to update paragraph contents in response to the events.)
At this stage you may note our code starts to have a lot of nested brackets of both types, ( and {. This is typical of JavaScript code, and a common source of errors while learning the language. Make sure you keep track of opening and closing brackets. Most plain text editors, such as Notepad++, automatically highlight the matching opening/closing bracket when placing the cursor on the other one. This can help with code structuring and avoiding errors due to unmatched brackets.
4.9 Hello example
We have now covered everything we need to know to translate the “Hello” (Section 4.3.5) and “Poles” (Section 4.3.6) examples to jQuery syntax. We will start with the “Hello” example where clicking on a button modifies the HTML content of a <p> element (Section 4.3.5).
First of all, we need to include the jQuery library (Section 4.5). We add the jQuery library with the following line of code inside the <head> element:
We are using a local file (Section 4.5.2) named jquery.js, which is stored in a directory named js placed along with our index.html file, which is why the file path is specified as js/jquery.js. We will elaborate on file structures and file paths for loading content in web pages in Section 5.5.
Next, we replace the following <script> contents, which uses plain JavaScript, given in example-04-01.html (Section 4.3.5):
function hello() {
    document
        .getElementById("demo")
        .innerHTML =
            "JavaScript can change page contents!";
}
document
    .getElementById("change_text")
    .addEventListener("click", hello);
with the equivalent jQuery version:
function hello() {
    $("#demo").html("JavaScript can change page contents!");
}
$("#change_text").on("click", hello);
In the last expression of the jQuery version, the #change_text element is selected to bind a "click" event listener to it. Whenever the user clicks on the button, the hello function is executed. The internal code of the hello function also uses a selector, this time accessing the #demo element. Once selected, the .html function changes the HTML content of the element to "JavaScript can change page contents!".
Note that for a shorter, though perhaps less manageable code, we could use an anonymous function inside the event listener definition:
$("#change_text").on("click", function() {
    $("#demo").html("JavaScript can change page contents!");
});
Here is the complete code of the modified “Hello” example, as given in example-04-05.html:
<!DOCTYPE html>
<html>
    <head>
        <title>Hello JavaScript (jQuery)</title>
        <script src="js/jquery.js"></script>
    </head>
    <body>
        <h2>JavaScript</h2>
        <p id="demo">What can JavaScript do?</p>
        <input type="button" value="Click Me!" id="change_text">
        <script>
            function hello() {
                $("#demo").html("JavaScript can change page contents!");
            }
            $("#change_text").on("click", hello);
        </script>
    </body>
</html>
Figure 4.6 shows that the new version is visually (and functionally) the same as the previous one (Figure 4.2); only the underlying code is different, now using jQuery rather than plain JavaScript.
FIGURE 4.6: example-04-05.html (Click to view this example on its own)
4.10 Poles example
Let’s modify the “Poles” example to use jQuery too. Again, we need to include the jQuery library in the <head> element. Then, we replace the original <script> which we saw in Section 4.3.6:
function showNorth() {
    document.getElementById("myImage").src = "images/north.svg";
}
function showSouth() {
    document.getElementById("myImage").src = "images/south.svg";
}
document.getElementById("north").addEventListener("click", showNorth);
document.getElementById("south").addEventListener("click", showSouth);
with the following alternative version:
function showNorth() {
    $("#myImage").attr("src", "images/north.svg");
}
function showSouth() {
    $("#myImage").attr("src", "images/south.svg");
}
$("#north").on("click", showNorth);
$("#south").on("click", showSouth);
The concept is similar to the previous example, only that instead of changing the HTML content of an element with the .html method, we are changing the src attribute with the .attr method. Here is the complete code of the modified “Poles” example, as given in example-04-06.html:
<!DOCTYPE html>
<html>
    <head>
        <script src="js/jquery.js"></script>
    </head>
    <body>
        <h2>Earth Poles Viewer</h2>
        <img id="myImage" src="images/north.svg"><br>
        <input type="button" value="North Pole" id="north">
        <input type="button" value="South Pole" id="south">
        <script>
            function showNorth() {
                $("#myImage").attr("src", "images/north.svg");
            }
            function showSouth() {
                $("#myImage").attr("src", "images/south.svg");
            }
            $("#north").on("click", showNorth);
            $("#south").on("click", showSouth);
        </script>
    </body>
</html>
The result is shown in Figure 4.7.
FIGURE 4.7: example-04-06.html (Click to view this example on its own)
4.11 The event object
So far, the functions which we passed to an event listener did not use any information regarding the event itself, other than the fact the event has happened. Sometimes, however, we may be interested in functions that have a variable effect, depending on event properties: such as where and when the event happened.
In fact, every time an event happens, an event object is passed to any event listener function responding to the event. We can use the event object to construct functions with variable effects depending on event properties. The event object has methods and properties related to the event that occurred. For example38:
.type—Type of event ("click","mouseover", etc.).key—Button or key that was pressed.pageX,.pageY—Mouse position.timeStamp—Time in milliseconds, from when the document was opened.target—The element that triggered the event (see Section 8.8.1)
Every function that responds to an event can take the event object as its parameter. That way, we can use the event object properties in the function body, to trigger a specific action according to the properties of the event.
The following small page example-04-07.html uses the .pageX and .pageY properties of the "mousemove" event to display up-to-date mouse coordinates every time the mouse moves on screen. Note how the event object–conventionally named e, but you can choose another name–is now a parameter of the event listener function. Also note that we are using the $(document) selector, since we want to “listen to” mouse movement over the entire document:
<!DOCTYPE html>
<html>
    <head>
        <script src="js/jquery.js"></script>
    </head>
    <body>
        <p id="position"></p>
        <script>
            $(document).on("mousemove", function(e) {
                $("#position").text(e.pageX + " " + e.pageY);
            });
        </script>
    </body>
</html>
The result is shown in Figure 4.8. The current mouse coordinates are displayed in the top-left corner of the screen. Every time the mouse is moved, the coordinates are updated.
FIGURE 4.8: example-04-07.html (Click to view this example on its own)
Different types of events are associated with different event object properties. Moreover, custom event types and event properties can be defined in JavaScript libraries. For example, later on in the book we will use the map click event to detect the clicked coordinates on an interactive map, then to trigger specific actions regarding that location. This is made possible by the fact that the "click" event on a map contains a custom property named .latlng, which can be accessed by the event listener function. We will see how this technique can be used for several purposes, such as:
- Displaying the clicked coordinates (Section 6.9)
- Adding a marker in the clicked location on the map (Section 11.2)
- Making a database query based on proximity to the clicked location (Section 11.4)
In Chapter 13, we will see another group of custom events referring to drawing and editing shapes on the map, such as "draw:created", which is fired when a new shape is drawn on the map.
4.12 Iteration over arrays and objects
As mentioned earlier, the jQuery library has several functions for tasks other than selecting elements and operating on selection. One such function is $.each. The $.each function is a general function for iterating over JavaScript arrays and objects. This function can be used as a cleaner and shorter alternative to for loops (Section 3.10.3.2), in cases when we need to do something on each element of an array or an object39. The $.each function accepts two arguments:
- The array or object
- A function that will be applied on each element
The second argument, i.e., the function passed to $.each, also takes two arguments:
key—The index (for an array) or the property name (for an object)value—The contents of the element (for an array) or the property value (for an object)
Like with e for “event” (Section 4.11), the parameter names key and value are chosen by convention. We could choose any pair of different names. The important point is that the first parameter refers to the index or property name, and the second parameter refers to the contents or the property value. For example, check out the following code:
var a = [52, 97, 104, 20];
$.each(a, function(key, value) {
    console.log("Index #" + key + ": " + value);
});
In the first expression, an array named a is defined. In the second expression, we are applying an (anonymous) function on each item of a. The function takes two arguments, key and value, and constructs a text string, which is printed in the console for each item. Note that the $.each method returns the array itself, which is why it is also being printed in the console.
- Open a web page where the jQuery library is included, such as
example-04-07.html.- Run the above code in the console and examine the printed output.
- Try rewriting the above code to use a
forloop (Section 3.10.3.2), instead of$.each. (Hint: start withfor(var i in a).)
4.13 Modifying page based on data
One of the most important use cases of JavaScript is dynamically generating page contents based on data. The data we wish to display on the page can come from various sources, such as an object in the JavaScript environment, a file, or a database. JavaScript code can be used to process the data into HTML elements, which can then be added to the DOM (Section 4.7) and consequently displayed in the browser. Modifying page contents based on data is also a use case where iteration (Section 4.12) turns out to be very useful.
Our next example is a simple and small web page, containing just two paragraphs and one unordered list (Figure 4.9). We already know how to write the necessary HTML code for such a web page (Chapter 1). The novel part in example-04-08.html is that we are going to generate some of the HTML code based on data and using JavaScript, rather than have the entire HTML contents predefined.
Let’s assume we need to dynamically create a list of items on our page, and we have an array with the contents that should go into each list item. We will use the jQuery $.each function for iterating over the array and adding its contents into an <ul> element on the page. For example, suppose we have the following array named data, including the Latin names of eight Oncocyclus Iris species found in Israel:
var data = [
    "Iris atrofusca",
    "Iris atropurpurea",
    "Iris bismarckiana",
    "Iris haynei",
    "Iris hermona",
    "Iris lortetii",
    "Iris mariae",
    "Iris petrana"
];
In the HTML code, we may initially have an empty <ul> placeholder:
which we would like to fill with the <li> HTML elements (Section 1.6.7.1) based on the above array of species names40, as follows:
<ul id="species">
    <li><i>Iris atrofusca</i></li>
    <li><i>Iris atropurpurea</i></li>
    <li><i>Iris bismarckiana</i></li>
    <li><i>Iris haynei</i></li>
    <li><i>Iris hermona</i></li>
    <li><i>Iris lortetii</i></li>
    <li><i>Iris mariae</i></li>
    <li><i>Iris petrana</i></li>
</ul>
Why not embed the above HTML code directly into the HTML document, instead of constructing it with JavaScript? Two reasons why the former may not always be a good idea:
- The contents can be much longer, e.g., tens or hundreds of elements, which means it is less convenient to type the HTML by hand. We could use tools such as Pandoc to programmatically convert text plus markup to HTML, thus reducing the need to manually type all of the HTML tags, but then it is probably more flexible to do the same with JavaScript anyway.
- We may want to build page content based on real-time data, loaded each time the user accesses the website, and/or make it responsive to user input. For example, a list of headlines in a news website can be based on a real-time news stories database and/or customized according to user preferences.
To build the above HTML code programmatically, based on the data array, we can use the $.each method we have just learned (Section 4.12). First, recall that $.each accepts a function that can do something with the key and value of each array element, such as collecting them in a two-element array and printing them into the console:
Check out the printed output (below). It includes eight arrays. In each array, the first element is the key (the index: 0, 1, …) and the second element is the value (the species name string).
[0, "Iris atrofusca"]
[1, "Iris atropurpurea"]
[2, "Iris bismarckiana"]
[3, "Iris haynei"]
[4, "Iris hermona"]
[5, "Iris lortetii"]
[6, "Iris mariae"]
[7, "Iris petrana"]
- Assign the
directoryobject from Section 3.10.3.2 to a variable nameddataand run the above$.eachiteration.- How did the printed
keyandvaluechange?- Repeat the exercise with
directory.musicians. What happened now?
Now that we know how to iterate over our array data, we just need to modify the function that is being applied. Instead of just printing the array contents in the console, we want the function to create new <li> elements in the DOM. Additionally, we need to create the empty <ul> placeholder element in our document (using HTML) that the <li> elements will be appended to, as shown above.
To create an empty <ul> element, we can add the following HTML code inside the <body>:
Note that we are using an ID to identify the particular <ul> element, in this case id="species". This is very important since we need to identify the particular element which our JavaScript code will operate on!
Next, to add a new <li> element inside the <ul> element, we can use the .append method, which inserts specified content at the end of the selected element(s) (Section 4.7.4). For example, the following expression will add one <li> element at the end of the list:
- Open
example-04-08.htmlin the browser.- Run the above expression in the console several times, to see more and more items being added to the list.
Instead of adding just one <li> item, what we actually need is to iterate over the data array, each time adding a <li> element as the last child of the <ul>. Replacing the constant <li> with a dynamic one, based on current value, and encompassing it inside a $.each iteration, the final code for dynamic construction of the list looks like this:
The above means we are iterating over the data array, each time adding a new <li> at the bottom of our list, with the contents being the current value (displayed in italics using <i>). Here is the complete code of the small web page example-04-08.html, implementing the dynamic creation of an unordered list using JavaScript:
<!DOCTYPE html>
<html>
<head>
<title>Populating list</title>
<script src="js/jquery.js"></script>
</head>
<body>
<p>List of rare <i>Iris</i> species in Israel:</p>
<ul id="species"></ul>
<p>It was created dynamically using jQuery.</p>
<script>
var data = [
"Iris atrofusca",
"Iris atropurpurea",
"Iris bismarckiana",
"Iris haynei",
"Iris hermona",
"Iris lortetii",
"Iris mariae",
"Iris petrana"
];
$.each(data, function(key, value) {
    $("#species").append("<li><i>" + value + "</i></li>");
});
</script>
</body>
</html>The result is shown in Figure 4.9.
FIGURE 4.9: example-04-08.html (Click to view this example on its own)
Again, in this small example the advantage of generating the list with JavaScript, rather than writing the HTML code by hand, may not be evident. However, this technique is very powerful in more realistic settings, such as when our data is much larger and/or needs to be constantly updated. For example, later on we will use this technique to dynamically generate a dropdown list with dozens of plant species names according to real-time data coming from a database (Section 10.4.4).
4.14 Working with user input
Our last example in this chapter concerns dynamic responses to user input (Section 1.6.12) on the page. In example-04-09.html, we will build a simple calculator app where clicking on a button multiplies two numbers the user entered, and prints the result on screen (Figure 4.10). In fact, we already covered everything we need to know to write the code for such an application. The only thing different from the previous examples, is that we are going to use the .val method (Section 4.7.7) to query the currently entered user input.
As usual, we start with HTML code. Importantly, our code contains three <input> elements:
- The first number (
type="number") - The second number (
type="number") - The “Multiply!” button (
type="button")
Here is the HTML code for just those three <input> elements:
<input type="number" id="num1" min="0" max="100" value="5">
<input type="number" id="num2" min="0" max="100" value="5">
<input type="button" id="multiply" value="Multiply!">
Note that all input elements are associated with IDs: num1, num2, and multiply. We need the IDs for referring to the particular elements in our JavaScript code. Below the <input> elements, we have an empty <p> element with id="result". This paragraph will hold the multiplication result. Initially, the paragraph is empty, but it will be filled with content using JavaScript code:
The only scenario where the contents of the page change is when the user clicks on the “Multiply!” button. Therefore, our <script> is in fact composed of just one event listener, responding to "click" events on the “Multiply!” button:
The function being passed to the event listener modifies the text contents of the <p> element. The inserted text gives the multiplication result, using the .val method to extract both input numbers, $("#num1").val() and $("#num2").val():
$("#multiply").on("click", function() {
    $("#result")
        .text("The result is: " +  $("#num1").val() * $("#num2").val());
});
It is important to note that all input values are returned as text strings, even when we are talking about numeric <input> elements. You can see this by opening example-04-09.html and typing $("#num1").val() in the console. However, when using the multiplication operator * strings are automatically converted to numbers, which is why multiplication still works41. Here is the complete code of our arithmetic web application, given in example-04-09.html:
<!DOCTYPE html>
<html>
    <head>
        <title>Working with user input</title>
        <script src="js/jquery.js"></script>
    </head>
    <body>
        <p>First number
      <input type="number" id="num1" min="0" max="100" value="5">
        </p>
        <p>Second number
      <input type="number" id="num2" min="0" max="100" value="5">
        </p>
      <input type="button" id="multiply" value="Multiply!">
        <p id="result"></p>
        <script>
            $("#multiply").on("click", function() {
                $("#result").text(
                    "The result is: " + $("#num1").val() * $("#num2").val()
                );
            });
        </script>
    </body>
</html>
The result is shown in Figure 4.10.
FIGURE 4.10: example-04-09.html (Click to view this example on its own)
4.15 Exercise
- Modify
example-04-09.htmlby adding the following functionality:- Make calculator history append at the top, to keep track of the previous calculations. For example, if the user multiplied 5 by 5, then 5*5=25 will be added on top of all other history items. If the user made another calculation, it will be added above the previous one, and so on (Figure 4.11).
- Add a second button for making division of the two entered numbers.
- Add a third button for clearing all previous history from screen. (Hint: you can use
.html("")to clear the contents of an HTML element.)
FIGURE 4.11: solution-04.html (Click to view this example on its own)
The
documentobject, like all other global objects, is in fact a property of thewindowobject. That is,documentis a shortcut forwindow.document.↩We will come back to the subject of specifying file paths in Section 5.5.↩
To get an impression of the various advanced selector types in jQuery, check out the interactive demonstration (https://www.w3schools.com/jquery/trysel.asp) by W3Schools, where the first few examples show basic selectors while the other examples show advanced ones.↩
There are many more jQuery methods that you can use. For other examples see the Working with Selections (https://learn.jquery.com/using-jquery-core/working-with-selections/) article by jQuery.↩
It is possible to bind two (or more) event listeners to the same selection in the same expression, thanks to the fact that the
.onmethod returns the original selection.↩A list of all standard event object properties can be found in the HTML DOM Events (https://www.w3schools.com/jsref/dom_obj_event.asp) reference by W3Schools.↩
The
.forEachmethod is another plain-JavaScript alternative to$.each, though.forEachis less general—it only works on arrays, not on objects.↩Note that we are also using the
<i>element (Section 1.6.5.3) to display species in italics.↩Try typing
"5"*"5"in the console to see this behavior in action.↩