Chapter 2 CSS
Last updated: 2018-11-11 20:44:58
2.1 What is CSS?
Cascading Style Sheets (CSS) is a language for specifying the appearance of web pages.
For example, CSS is used to specify -
- Fonts
- Colors
- Arrangement of elements on the page
The key to understanding how CSS works is to imagine that there is an invisible box around every HTML element (Figure 2.1).
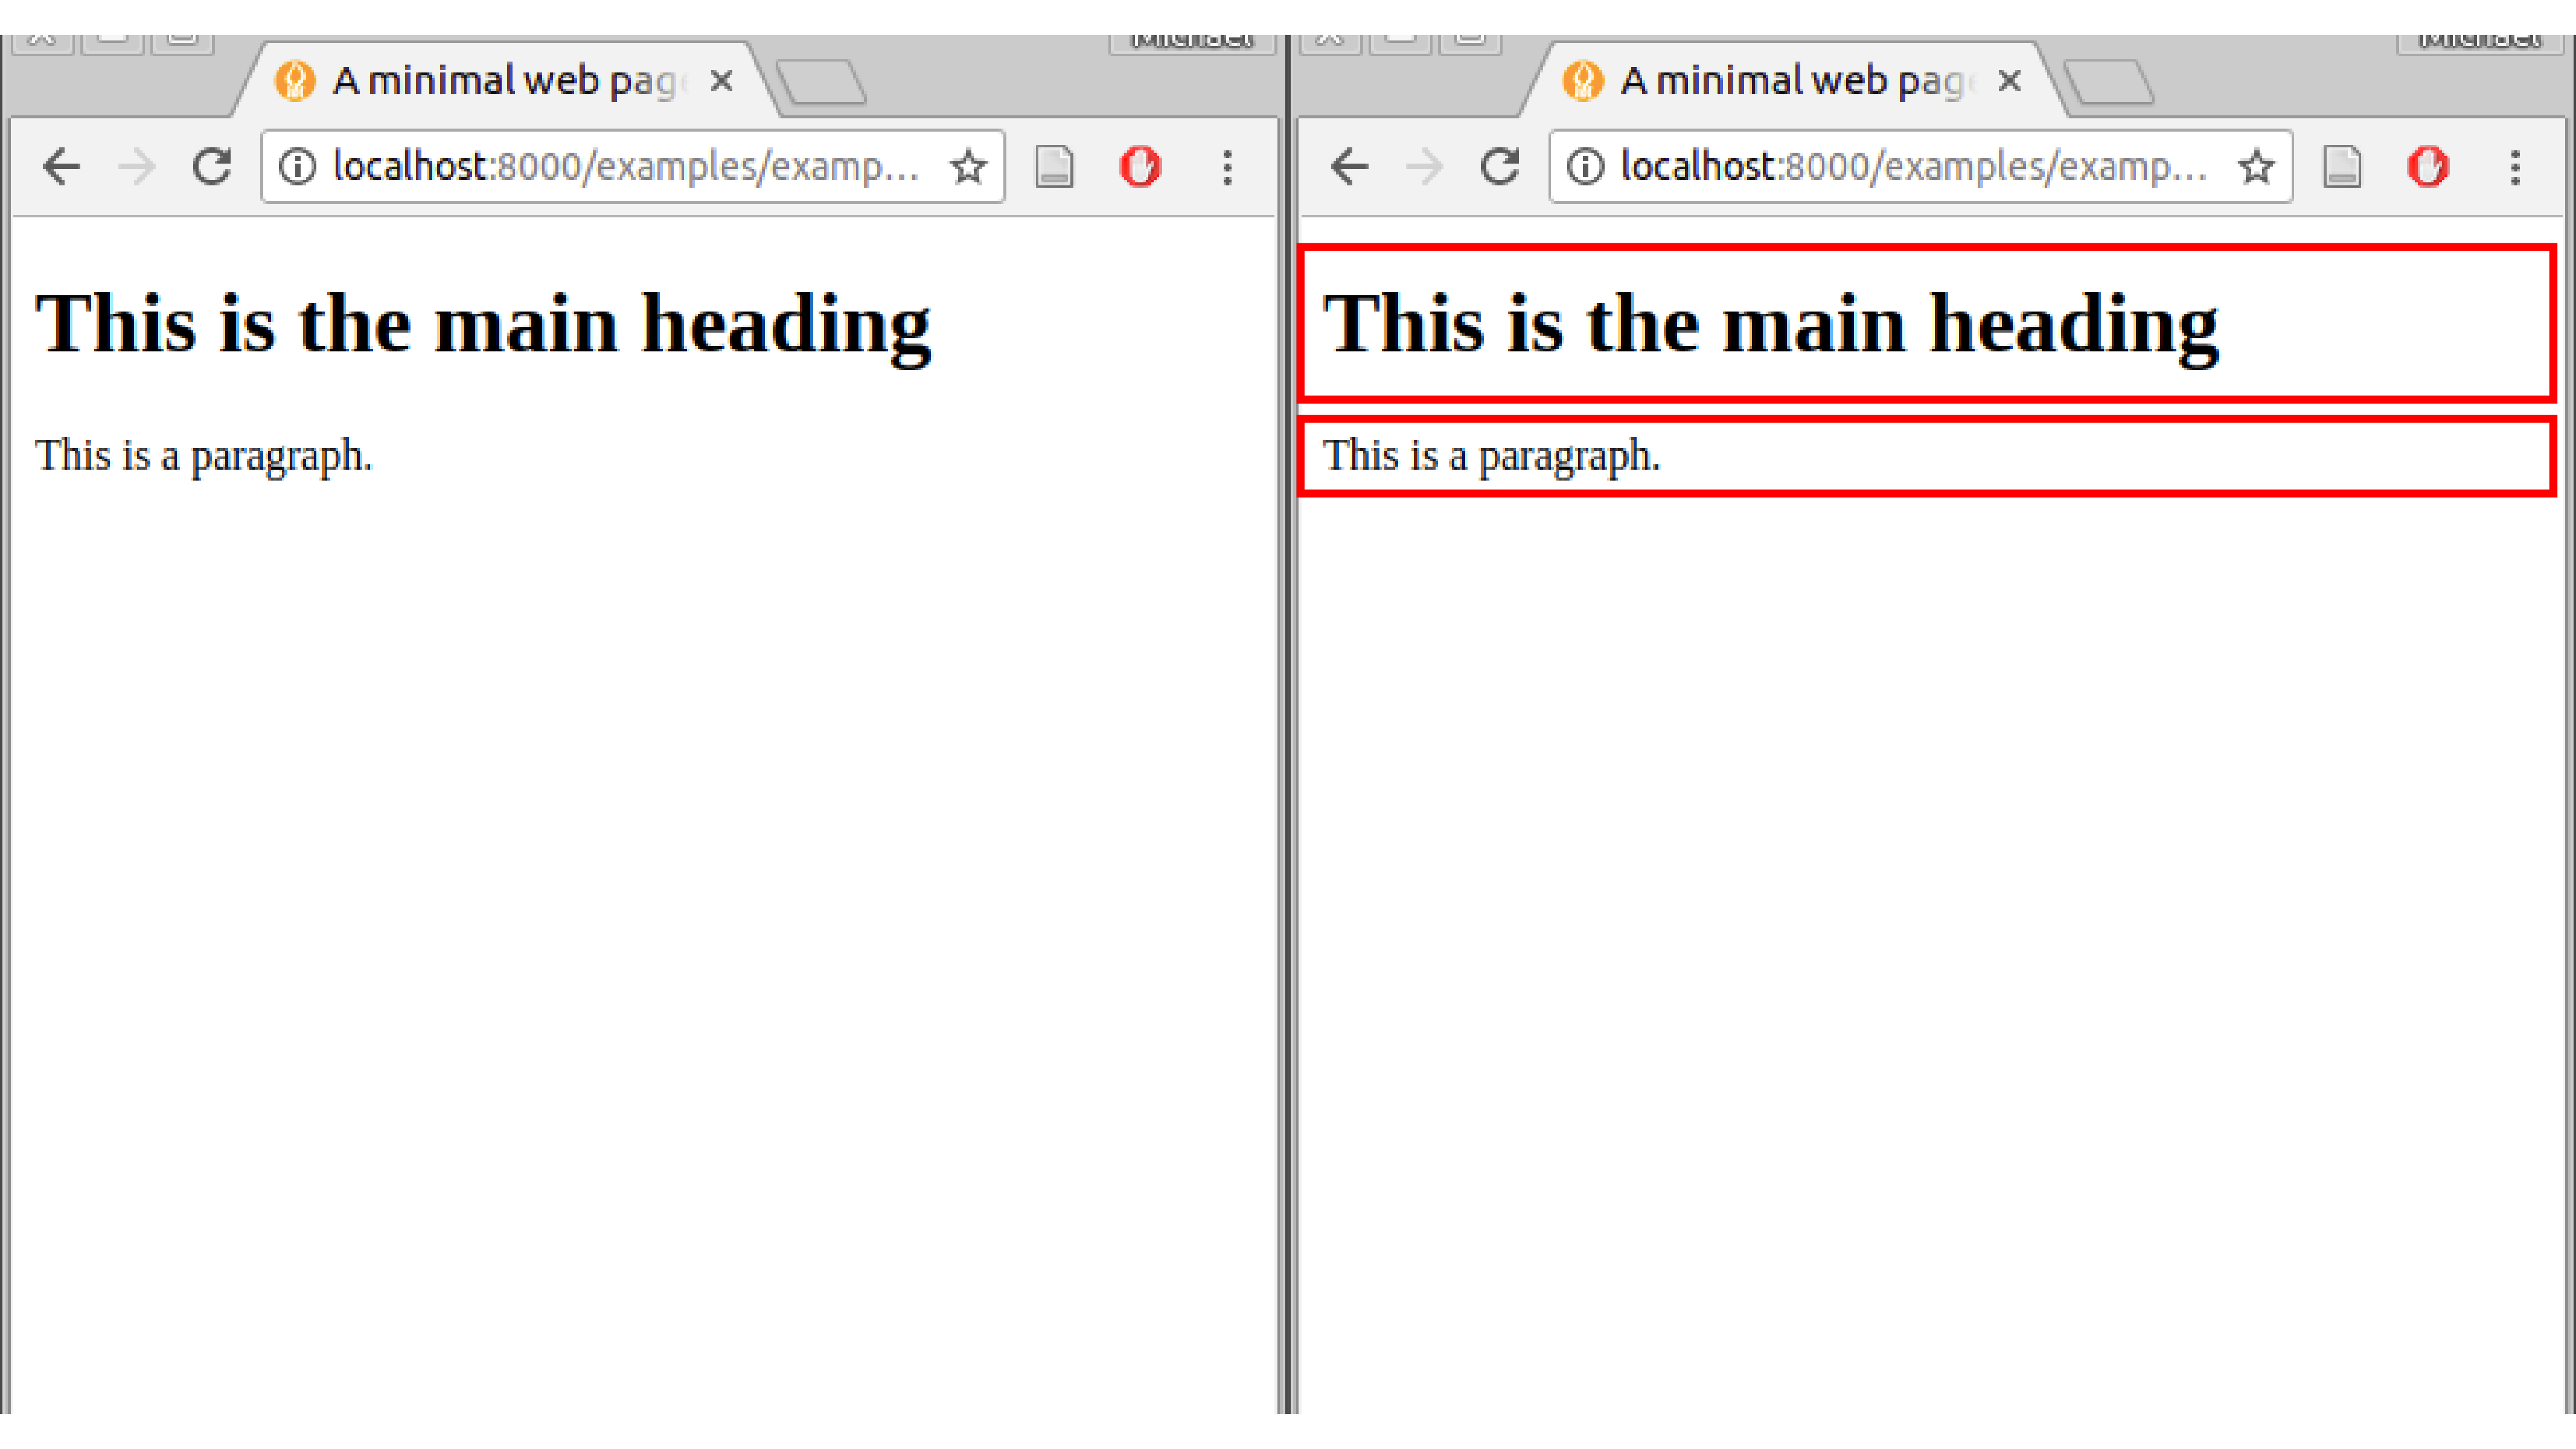
FIGURE 2.1: HTML box model
CSS allows us to create rules that control the way that each individual box, and the contents of that box, is presented. CSS is run when it is linked to HTML code, while that HTML code is processed and visually presented by the browser.
2.2 CSS rules
CSS works by associating rules with HTML elements. The CSS rules govern how the content of specified elements should be displayed. A CSS rule contains two parts -
- A selector
- One or more declarations
The selector specifies which HTML elements the rule applies to. The declarations indicate how the elements referred to in the selector should be styled. Each declaration is split into two parts: a property name and a property value.
Here is an example of a CSS rule -
a {
    color: white;
}
This particular rule indicates that all <a> elements should be shown with white color. Let’s go through the structure of this rule -
ais the selector, specifying that the rule applies to all<a>elements- Curly braces
{...}contain the declarations - In this case there is only one declaration
color: white;, which means that the affected elements will be colored in white. The declaration is composed of -- A property name (
color) indicating the aspect we want to change - A property value (
white) specifying the settings we want to use for the chosen property - The property name and property value are separated with
: - The declaration ends with
;
- A property name (
Here is another example -
a { font-style: italic; }Table 2.1 summarizes these definitions.
| Component | Example |
|---|---|
| CSS rule |
a { font-style: italic; }
|
| Selector |
a { font-style: italic; }
|
| Declaration |
a { font-style: italic; }
|
| Property name |
a { font-style: italic; }
|
| Property value |
a { font-style: italic; }
|
This time the rule indicates that all <a> elements should be shown in italics. The only difference from the previous example is that the declaration color: white; was replaced with the declaration font-style: italic;.
Again, note the different components of the CSS rule, most importantly the selector, the property name and the property value.
2.3 CSS selectors
Within a CSS rule, the selector specifies which HTML elements will be affected by the rule. There are many different types of CSS selectors that allow you to target rules to specific elements in an HTML document.
Some of the CSS selectors are used to target specific CSS elements, while other selectors specify selector combinations. Tables 2.2 and 2.3 summarize the two types of CSS selectors, respectively.
| Selector | Meaning | Example |
|---|---|---|
| Universal Selector | Applies to all elements in the document | * {} Targets all elements on the page |
| Type Selector | Matches element names | h1 {} Targets the h1 elements |
| Class Selector | Matches all elements whose class matches the one specified after the dot (.) |
.note {} Targets any element whose class attribute has a value of "note". p.note {} Targets only p elements whose class attribute has a value of "note" |
| ID Selector | Matches an element whose id matches the one specified after the hash (#) |
#introduction {} Targets the element whose id attribute has the value of "introduction" |
| Selector | Meaning | Example |
|---|---|---|
| Multiple Selector | Matches elements corresponding to any of the selectors | h1, h2, h3 {} Targets the h1, h2 and h3 elements |
| Descendant Selector | Matches an element that is a descendant of another element (not necessarily direct child) | p a {} Targets all a elements that sit inside a p element, even if there are other elements between them |
| Child Selector | Matches an element that is a direct child of another element | li>a {} Targets all a elements that are children of li elements |
| Adjacent Sibling Selector | Matches an element that is the nearest sibling of another | h1+p {} Targets those p elements which come right after an h1 element |
| General Sibling Selector | Matches an element that is a sibling of another | h1~p {} Targets all p elements that follow, immediately or not, an h1 element |
Throughout this book we will use the following most commonly used selectors -
- Type selector and multiple elector (
h1, h2, h3 {}) - Class selector (
.note {}) - ID selector (
#introduction {}) - Descendant selector (
p a {})
More details on these selectors are given in the following Sections 2.3.1 to 2.3.4.
2.3.1 Type selector
The type selector applies to the element(s) of the specified type in the linked HTML code. In case there are more than one, the type names should be separated by a comma.
For example, the following rule applies to all <a> elements -
a {
    color: white;
}
While the following rule applies to all <a> and all <p> elements -
p, a {
  color: white;
}
2.3.2 Class selector
The class selector contains a full stop (.), and the part after the full stop describes the name of a class. All elements that have a class attribute with the appropriate value will be affected by the rule.
For example, the following rule applies to all elements that have the attribute class="figure" -
.figure {
    display: block;
    margin-left: auto;
    margin-right: auto;
}
We can combine the class selector with the type selector. This means the rule will no longer apply to all elements with the appropriate class, but only to the HTML elements of a particular type and the appropriate class.
For example, the following rule now applies to all <img> elements that have the attribute class="figure" -
img.figure {
    display: block;
    margin-left: auto;
    margin-right: auto;
}
2.3.3 ID selector
The ID selector contains a hash character (#). The rule will apply to all elements that have the specified id attribute. Since the id is unique, this type of rule can be used to control the appearance of exactly one element.
For example, the following rule applies to the specific element which has the attribute id="footer" -
#footer {
    font-style: italic;
}
The ID selector can also be combined with the type selector. However, there can only be one element with a given id within an HTML document. This means that the HTML element name is redundant can be left out.
For example, the rule below has the same effect as the previous one -
p#footer {
    font-style: italic;
}
2.3.4 Descendant selector
The descendant selector contains several element names, separated by spaces. This allows a CSS rule to be applied to an element only when the element is contained within another type of element.
For example, the following rule applies to all <a> elements that are within <p> elements. Note that the <a> element does not need to be immediately within the <p> element (unlike with the child selector, see Table 2.3).
p a {
    color: white;
}
2.4 CSS conflicts
It is possible for CSS rules to conflict, i.e., for there to be more than one rule for the same element.
In case of conflict, generally a more specific rule will override a less specific one. For example, and ID selector will override a type selector, since the former is more specific. For example, given the following set of CSS rules, a <p> element with id="intro" will be colored red, while all other <p> elements will be colored black.
p {
    color: black;
}
p#intro {
    color: red;
}
If there are two rules having the same level of specificity, the rule that is specified last wins. For example, if two CSS files are linked in the header of an HTML document and they both contain rules with the same selector, then the rule in the second file (i.e. the one processed later be the browser) will override the rule in the first file.
For example, using the following set of rules, all <p> element will be colored red.
p {
    color: black;
}
p {
    color: red;
}
As another example, the following CSS document has numerous conflicts -
* {
   font-family: Arial, Verdana, sans-serif;
}
h1 {
   font-family: "Courier New", monospace;
}
i {
   color: green;
}
i {
   color: red;
}
b {
   color: pink;
}
p b {
   color: blue;
}
p#intro {
   font-size: 100%;
}
p {
   font-size: 75%;
}
Ignore the properties for now, only consider the selectors. Based on the conflict-resolving guidelines described above, here is how this particular set of rules will be processed by the browser -
- The
h1rule will override the*rule, sinceh1is more specific than*- Therefore the heading will be shown in
"Courier New"font
- Therefore the heading will be shown in
- The
p brule will override thebrule, sincep bis more specific thanb- Therefore bold text will be shown in blue
- The
p#introwill override theprule, sincep#introis more specific thanp- Therefore the introduction will be shown with larger font
- The second
iselector will override the first one, since it is specified later- Therefore italic text will be shown in red
An example of a web page where the above CSS rules are applied (example-02-01.html) is shown on Figure 2.2.
FIGURE 2.2: example-02-01.html (Click to view this example on its own)
2.5 CSS inheritance
Some CSS property values are inherited, since it makes sense to specify them for an element as well as all of its descendants. Other CSS properties are not inherited, since inheritance would not make sense.
For example, it makes sense for font-family and color to be inherited, as that makes it easy to set a document-wide base font and base color by setting the font-family and color on the <body> element. That way, all of the heading, paragraphs, etc. of the document are uniformly displayed in the same font and color. When necessary, you can override the fonts and/or colors on individual elements where needed, relying on the fact that a specific rule overrides a general one. It would be really annoying to have to set the base font separately on every element.
Contrariwise, it makes no sense for margin, padding, border, and background-image to be inherited. Imagine the styling mess that would occur if you set these properties on a container element and had them inherited by every single internal element! It should be noted that when necessary, forcing a property to inherit values from their parent element can be done by using the keyword inherit as the respective property value.
A more detailed description of CSS conflict resolution and inheritance can be found in the Cascade and inheritance article by Mozilla.
2.6 Linking CSS to HTML
There are three methods in which CSS code can be linked to an HTML document -
- Inline CSS
- Embedded CSS
- External CSS
The following Sections 2.6.1, 2.6.2 and 2.6.3 shortly explain each of these methods.
2.6.1 Inline CSS
The simplest approach is to include CSS code within the style attribute of an HTML element. As mentioned in Section (style-2), style is one of three general HTML attributes that can appear in every type of element (along with id and class). The value of the style attribute contains CSS rules applying to that element, in what is called inline CSS.
For example -
<p style="font-style: italic">Here, CSS is used to control the appearance of text within this paragraph only.
Note that with inline CSS the code consists of declaration(s) only. Selectors are not needed, since inline CSS by definition only applies to a specific HTML element where the attribute appears.
Using inline CSS is generally not recommended, and should be used sparingly, because it -
- Mixes CSS code with HTML code, making both of them harder to maintain
- Requires repeating CSS code in all element where the same style needs to be applied
2.6.2 Embedded CSS
It is also possible to include CSS code within a <style> element within the <head> element of HTML code (Section 1.5.3.1). This approach is called embedded CSS.
For example -
<!DOCTYPE html>
<html>
    <head>
        <style>
            p {
                font-style: italic;
            }
        </style>
...
In this case, the appearance of text within all paragraphs is controlled with a single CSS rule.
This approach is better than inline CSS because rules are not attached to each individual HTML element. However, this is still not ideal, because -
- The separation between HTML and CSS is incomplete - though all CSS code is in one place, it is still tied to the HTML document
- Consequently, any reuse of the CSS code with other HTML code requires making multiple copies of the same CSS code
2.6.3 External CSS
The third approach, called external CSS, is writing CSS code in a separate file and referring to the CSS file from the HTML code. The CSS file is referred to using a <link> element within the <head> element (Section 1.5.3.2).
For example -
<!DOCTYPE html>
<html>
    <head>
        <link rel="stylesheet" href="sty1.css" type="text/css">
...
This <link> element refers to a file with CSS code, in this case a file named sty1.css.
The contents of the my_style.css file is plain CSS code, such as -
p {
    font-style: italic;
}
This approach is the recommended way of using CSS, since it makes HTML and CSS code completely separate. This makes the CSS code easier to maintain.
Additionally, it makes the code reusable, as the same CSS file can be linked to multiple HTML files. That way, for example, the same styling can be applied to all pages of a given website, while still keeping the CSS code in one place rather than repeating it.
2.7 CSS properties
Section 2.7 (this section) gives examples of CSS properties controlling the following three main aspects of content styling. These categories can be divided into three groups: color (Section 2.7.1), text (Section 2.7.2) and boxes (Section 2.7.3). Table 2.4 lists the specific properties that we are going to cover.
| Category | Property | Description |
|---|---|---|
| Color | color: |
Foreground color |
background-color: |
Background color | |
| Text | font-family: |
Font family |
font-style: |
normal or italic |
|
font-weight: |
normal or bold |
|
font-size: |
Font size | |
text-align: |
Text alignment (e.g. center) |
|
| Boxes | width: |
Box width |
height: |
Box height | |
border-width: |
Border width | |
border-style: |
Border style (e.g. dotted) |
|
border-color: |
Border color | |
border-radius: |
Border radius | |
margin: |
Margin size | |
padding: |
Padding size | |
position: |
Positioning method (e.g. fixed) |
|
top: |
Top offset | |
bottom: |
Bottom offset | |
right: |
Right offset | |
left: |
Left offset | |
z-index: |
Z-index |
Note that there are many other CSS properties which we are not going to cover due to lack of space. The CSS Guides and Reference by Mozilla can be referred to for more information.
2.7.1 Color
2.7.1.1 color:, background-color:
The color: property controls the foreground color (e.g., for displaying text). The background-color: property controls the background color. The most common ways of specifying the color itself, i.e. the property value are summarized in Table 2.5 and described below.
| Method | Example |
|---|---|
| RGB | rgb(255,255,0) |
| RGBA | rgba(255,255,255,0.5) |
| HEX | #ee3e80 |
| Color name | red |
- RGB values - express colors in terms of how much red, green and blue are used to make it up. The values can be integer (from 0 to 255) or percentages. For example:
rgb(255,255,0)means yellow, since red and green are set to maximum while blue is set to zero;rgb(100%,100%,0%)is another way of specifying the same color - RGBA values - same as RGB, but with an extra alpha channel representing transparency (0 = fully transparent, 1 = fully opaque). For example:
rgba(0,0,0,0.5)means 50% transparent black, i.e. grey - HEX codes - These are six-digit codes that represent the amount of red, green and blue in a color, preceded by a hash
#sign. Each pair of digits specifies a number between 0 and 255 in hexadecimal notation. For example:#ee3e80specifies dark pink color. An interactive visualization of HEX-RGB comparison can be found in the Colors HEX reference by W3Schools. - Color names - There are several predefined color names which are recognized by browsers. For example:
black,white,red,green,blue. The X11 Color Names Wikipedia entry gives a list of predefined color names along with their RGB and HEX codes. It is useful to go over it, to get a feeling of these three color specification systems.
For example, the following CSS code specifies the color: property for <h1>, <h2> and <p> elements on the page -
/* color name */
h1 {
    color: DarkCyan;
}
/* hex code */
h2 {
    color: #ee3e80;
}
/* rgb and rgba values */
p {
    background-color: rgba(255,255,0,0.8);
    color: rgb(100,100,90);
}
A small example example-02-02.html demonstrating the effect of these rules is shown on Figure 2.3.
FIGURE 2.3: example-02-02.html (Click to view this example on its own)
The Color reference by Mozilla gives more examples of specifying color in CSS.
Note that we used CSS comments in the last example. CSS comments are written between the /* and the */ symbols, like so -
/* This is a CSS comment */2.7.2 Text
2.7.2.1 font-family:
The font-family: property controls the font for text within an element.
The value of the font-family: property can be -
- A specific family-name, such as
"Times New Roman",Courier,Arial - A generic generic-family, such as
serif,sans-serif,monospace
It is a good idea to specify several values, separated by commas, to indicate that they are alternatives. The browser will select the first font in the list that is installed or that can be downloaded. The recommendation which we follow here is to put quotes around font names that contain spaces, such as "Times New Roman".
The last option on the list is usually a generic-family. In case the person viewing the result does not have any of the specific fonts on their computer, the browser will fall back to the generic family.
For example -
.serif {
    font-family: Times, "Times New Roman", Georgia, serif;
}
.sansserif {
    font-family: Verdana, Arial, Helvetica, sans-serif;
}
.monospace {
    font-family: "Lucida Console", Courier, monospace;
}
The first rule means that a Times, "Times New Roman" or Georgia font will be used if available (ordered from highest to lowest preference). Otherwise, the browser will choose a serif font that is available.
More details on the font-family: property can be found in the font-family reference by Mozilla.
2.7.2.2 font-style:, font-weight:, font-size:
These properties control the detailed appearance of text.
The font-style: can be normal or italic.
The font-weight: can be normal or bold.
The font-size: determines font size, and can be specified in several ways -
- In pixels, for example:
12px - In percentages relatively to the default, for example:
75% - In ems, which is equivalent to the width of the letter M (in the current font size), for example:
1.3em
2.7.2.3 text-align:
The text-align: property controls the alignment of text within an element, with possible values left, right, center, or justify.
For example -
body {
    font-family: "Lucida Console", Courier, monospace;
}
h2 {
    font-family: "Times New Roman", Times, serif;
    font-style: italic;
}
p {
    font-size: 1.2em;
    text-align: center;
}
The example-02-03.html example demonstrates the effect of the above CSS rules (Figure 2.4).
FIGURE 2.4: example-02-03.html (Click to view this example on its own)
2.7.3 Boxes
At the beginning of this lesson, you saw how CSS treats each HTML element as if it lives in its own box.
You can set several properties that affect the appearance of these boxes.
For example, using CSS it is possible to -
- Control the dimensions of boxes
- Create borders around boxes
- Set margins and padding for boxes
Every box has three properties that can be adjusted to control its boundaries -
- Margin - Margins sit outside the edge of the border. You can set the width of a margin to create a gap between the borders of two adjacent boxes. Margins are always transparent.
- Border - Every box has a border, even if it is not visible or is specified to be 0 pixels wide. The border separates the edge of one box from another.
- Padding - Padding is the space between the border of a box and any content contained within it. Adding padding can increase the readability of the contents.
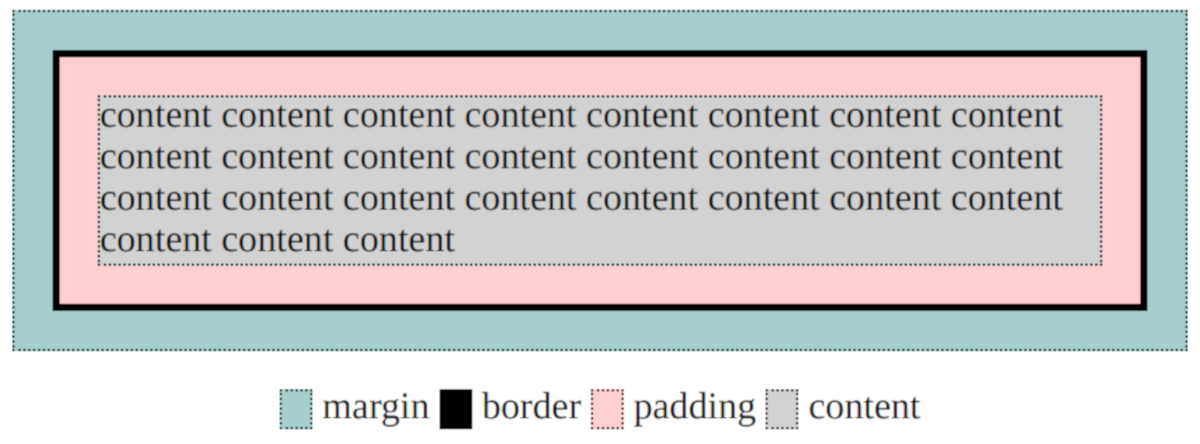
FIGURE 2.5: Margin, border and padding around an HTML element
For a good discussion of the CSS box model check out the CSS Positioning article on http://www.brainjar.com/.
2.7.3.1 width:, height:
By default, a box is sized just big enough to hold its contents. For example, a paragraph of text expands to fill the width of the page and uses as many lines as necessary, while an image has an intrinsic size - the number of pixels in each direction. The width: and height: properties provide means to override the default width and height and explicitly control of the dimensions of an element.
Widths or heights can be specified either as percentages (of the parent element) or as absolute values. Absolute values must include a unit, such as px for pixels.
For example, within a web page that is 800 pixels wide to make a paragraph of text half the width of the page, we can use either of the following specifications -
p { width: 50% }
p { width: 400px }
It is important to note that element width: and height: determine the content size, so if we also add padding (Section 2.7.3.4) and borders (Section 2.7.3.2) then the final size of the element will be larger than intended. There is a property named box-sizing: which solves this problem by specifying the total size, including content, padding and border.
The following HTML document example-02-04.html uses the width: and height: properties to create three <div> elements, each having 100px height and 20% width. The <div> element has no content, yet it is visible because it has a background color.
<!DOCTYPE html>
<html>
    <head>
        <title>CSS box size</title>
        <style>
            div {
                height: 100px;
                width: 20%;
                background-color: powderblue;
            }
        </style>
    </head>
    <body>
        <p>
            The following three 'div' elements have heights of
            <b>100px</b> and widths of <b>20%:</b>
        </p>
        <div>1</div>
        <div>2</div>
        <div>3</div>
    </body>
</html>
The resulting page is shown on Figure 2.6.
FIGURE 2.6: example-02-04.html (Click to view this example on its own)
2.7.3.2 border-width:, border-style:, border-color:, border-radius:
These properties control the appearance of borders (Figure 2.5) around an element.
The border-width: property sets border width. The border-style: property sets border style. Possible values for border-style: include solid, dotted, double and dashed. The border-color: property sets border color.
These properties affect all four borders. There are also specific properties that affect only the top, left, right, or bottom border of an element. These can be used by adding -top-, -left-, -right- or -bottom- in the property name, respectively. For example, the following CSS rule produces horizontal lines at the top of all paragraphs on a web page -
p {
    border-top-width: 1px;
    border-top-style: solid;
}
The border-radius: property can be used to make the border corners appear rounded.
2.7.3.3 margin:
The margin: property controls how much space is allocated around the outside of the element (Figure 2.5), that is, between the given element and its neighboring elements. The size of margins can be expressed using different units, as in the width: and height: properties.
The margin: property affects all four margins. Just like with borders, there are also properties for controlling individual margins: margin-top:, margin-bottom:, margin-right: and margin-left:.
2.7.3.4 padding:
The padding: property controls how much space is allocated between the border of the element and the element’s contents (Figure 2.5). Values are specified the same way as for margins.
Similarly, there are specific properties (padding-top:, etc.), for controlling the padding on each side of the element.
- Make your own copy of
example-02-04.htmland modify the following aspects- Add more text within the
<div>elements- Add CSS rules to separate the
<div>elements from each other (using margins) and to separate their text from the border (using padding)- Add CSS rules to show a colored border for each
<div>element
2.7.3.5 position:, top:, bottom:, right:, left:
The position: property specifies the positioning method for an element. Possible values for the position: property include -
static(the default)relativeabsolutefixed
In normal flow (position: static), each block-level element sits on top of the next one. Since this is the default way in which browsers treat HTML elements, you do not need a CSS property to indicate that elements should appear in normal flow, but the syntax would be:
position: static;Relative positioning with position: relative moves an element in relation to where it would have been in normal flow. For example, you can move it 10px lower than it would have been in normal flow or 20% to the right.
With relative positioning, the offset properties, top: or bottom: and/or left: or right:, are used to indicate how far to move the element from where it would have been in normal flow. To move the box up or down, you can use either the top: or bottom: properties. To move the box left of right, you can use either the left: or right: properties. The values of the box offset properties are usually given in pixels (10px), percentages (30%) or ems (8em).
Absolute positioning with position: absolute places the element relatively to the nearest “positioned” ancestor. A “positioned” element is one whose position is anything except position: static. However, if an absolute positioned element has no positioned ancestors, it uses the document <body>. In the latter case the element moves along with page scrolling, i.e. does not stay in the same place on screen. For example, we can specify that a <div> is located 10 pixels from the top and 10 pixels from the left of its containing <div>.
Fixed positioning with position: fixed is relative to the viewport, which means it always stays in the same place even if the page is scrolled.
Both position: absolute and the position: fixed positioned elements are taken out of normal flow. This means the elements “hover” above the page, while other elements shift to fill the place they previously occupied. This also means that these element can obstruct the view of other elements.
For example, the web page shown below has three <div> elements, generally styled to have certain dimensions, background color, and borders using the CSS code shown below -
div {
    height: 100px;
    width: 150px;
    background-color: powderblue;
    padding: 20px;
    margin: 5px;
    border-width: 1px;
    border-style: solid;
}
There are two additional styling rules, div#one and div#two (see below), affecting just the first and second <div> elements, respectively.
The resulting page is shown on Figure 2.7.
FIGURE 2.7: example-02-05.html (Click to view this example on its own)
The first <div> has a relative position, thus shifted from its normal flow by 30px from bottom and by 40px from left. Note that thought the element is shifted, its original position is maintained in normal flow, rather than filled up with other content.
div#one {
    position: relative;
    bottom: 30px;
    left: 40px;
}
- Create your own copy of
example-02-05.html- Delete the
div#onerule from the source code- Open the new version in the browser to observe how the first
<div>goes back to its “natural” position (compared to Figure 2.7)
The second <div> element has an absolute position, placing it relatively to the nearest “positioned” ancestor. Since it has none such ancestors, the <div> is placed relatively to the <body>, that is, relatively to the viewport. Specifically, the second <div> is placed 30px from the bottom of the viewport and 40px from the left of the viewport.
div#two {
    position: absolute;
    bottom: 30px;
    left: 40px;
}
Note that the second <div> obstructs some of the text shown in the <p> elements. You can also see that the third div is placed below the first one. Both of these outcomes are due to the fact that absolutely placed elements go out of the ordinary flow. Therefore the second <div> is not affected by underlying texts, as if it is hovering above the text. The place in the normal flow is cleared for other content to take place, such as the third <div>.
- Can you guess why the 3rd
<div>is above the 2nd one?- Hint: delete the
div#tworule and see what happens to these two<div>elements
2.7.3.6 z-index:
When you move any element out of normal flow, boxes can overlap. The z-index: property allows you to control which box appears on top.
The z-index value can be specified with any integer (positive, zero, or negative). An element with greater z-index value is always in front of an element with a lower z-value.
Note that the z-index only works on positioned elements, set with one of the following -
position: relativeposition: absoluteposition: fixed
More information and examples on positioning can be found in the Position article by Mozilla.
2.8 Example: Hurricane scale
In the next two sections we will summarize what we learned about CSS in two practical examples. In the first example, we create a page that visualizes the Hurricane scale based on wind speed, going from a Tropical Depression (\(\leq 17\, \frac{m}{s}\)) to a Level Five hurricane (\(\geq 70\, \frac{m}{s}\)).
We begin with a plain HTML code of example-02-06.html, without any styling -
<!DOCTYPE html>
<html>
    <head>
        <meta charset="UTF-8">
        <title>Hurricane scale</title>
    </head>
    <body>
        <h1>Hurricane Scale</h1>
        <p id="five">Five ≥70 m/s</p>
        <p id="four">Four 58–70 m/s</p>
        <p id="three">Three 50–58 m/s</p>
        <p id="two">Two 43–49 m/s</p>
        <p id="one">One 33–42 m/s</p>
        <p id="ts">Tropical storm 18–32 m/s</p>
        <p id="td">Tropical depression ≤17 m/s</p>
        <p>
            <a href="https://en.wikipedia.org/wiki/
                Saffir%E2%80%93Simpson_scale">(Data Source)
            </a>
        </p>
    </body>
</html>
This page has one <h1> heading and seven <p> paragraphs representing the various wind speed classes.
The result (Figure 2.8) does not look very impressive. We can improve it by adding graduated colors to the hurricane classes.
FIGURE 2.8: example-02-06.html (Click to view this example on its own)
Here is CSS code which we can use to make the page more interesting -
body {
  background-color: silver;
  padding: 20px;
  font-family: Arial, Verdana, sans-serif;
}
h1 {
  background-color: rgba(255,255,255,0.5);
  color: #64645A;
  padding: inherit;
}
p {
  padding: 5px;
  margin: 0px;
}
p#five {background-color: #ff6060;}
p#four {background-color: #ff8f20;}
p#three {background-color: #ffc140;}
p#two {background-color: #ffe775;}
p#one {background-color: #ffffcc;}
p#ts {background-color: #00faf4;}
p#td {background-color: #5ebaff;}
- Add the following CSS code to the above page. You can use either of the two methods presented earlier in this lesson
- Embedded CSS - Code goes in the
<style>element within the<head>element of the HTML document- External CSS - Code goes in a separate
.cssfile, then linked using the<link>element within the<head>element of the HTML document- Remove or modify some of the rules to examine their effect
The Hurricane scale page after applying the above CSS rules is given in example-02-07.html and shown on Figure 2.8.
FIGURE 2.9: example-02-07.html (Click to view this example on its own)
2.9 Example: Map Description
In our second CSS example, we are going to style title and description panels which can be used to describe a web map in cases when it fills the entire screen. You can see the final result we aim at on Figure Figure 2.13.
We start with the following HTML content in the <body> element -
<h1>Leaflet Quick Start Guide</h1>
<div id="description">
    <h2>About this map</h2>
    <p>This is the final result of the
        <a href="http://leafletjs.com/examples/quick-start/"
            target="blank">Leaflet Quick Start Guide
    </a>.
    The map demonstrates Leaflet basics, such as setting up
    a Leaflet map, adding markers, polylines and popups.</p>
    <p>The placement and styling of the title and description
    boxes is done using CSS. Check out the source code of this
    page to see how.</p>
    <p>Map authored by Michael Dorman</p>
</div>
The HTML code contains -
- An
<h1>element, which will comprise the map title - A
<div>element, which will comprise the map description
The map title in the <h1> element is just text, saying Leaflet Quick Start Guide.
The map description in the <div> element is composed of a smaller title (<h2>) and three paragraphs (<p>). Using the <div> element binds the entire description with an ID (id="description"). That ID will be used to set the description style with CSS. It is not necessary to set an ID for the map title <h1> element, since the page will have only one <h1> element in the page so it can be targeted with a type selector (Section 2.3.1).
The result is shown on Figure 2.10.
FIGURE 2.10: example-02-08.html (Click to view this example on its own)
Assuming our web map is going to fill the entire screen, we would like to position the title and description in boxes “above” the map. As discussed in Section 2.7.3.5, this means we need the boxes to exit normal flow, using position: absolute or position: fixed.
To achieve this, we add the following CSS rules in example-02-09.html -
h1 {
    position: absolute;
    top: 10px;
    left: 55px;
    margin-top: 0;
    padding: 10px 15px;
    background-color: rgba(255, 255, 255, .5);
    border: 1px solid grey;
    border-radius: 3px;
}
#description {
    position: absolute;
    bottom: 0;
    left: 10px;
    width: 280px;
    margin-bottom: 20px;
    padding: 0 15px;
    background-color: rgba(255, 255, 255, .7);
    border: 1px solid grey;
    border-radius: 3px;
}
In the above CSS code, we are using several concepts -
- The
position: absoluteproperty along withtop:andleft:orbottom:andleft:, to put the title and description into a specific position on the page - The
margin:,margin-top:,margin-bottomandpadding:properties, to make sure there is enough space around the text as well as around the boxes - The
border:andborder-radius:, to make the box border visible and having rounded corners - The
background-color:property to make the background color semi-transparent white
There are also two CSS shortcuts which we have not met up until now -
- Using
border: 1px solid grey;as a shortcut forborder-width: 1px,border-style: solidandborder-color: greyin the same declaration - Using
padding: 10px 15px;as a shortcut forpadding-top: 10px,padding-bottom: 10px,padding-right: 15pxandpadding-left: 15pxin the same declaration
CSS has many types of shortcuts of this sort, and we will encounter several other ones in later Chapters.
The result after applying the above CSS rules is shown on Figure 2.11. As you can see, the title an map description are now in separate bordered boxes, positioned in the specified place inside the viewport.
FIGURE 2.11: example-02-09.html (Click to view this example on its own)
There are more CSS properties that can be modified to make the boxes even nicer. For example, we can use specific fonts (free ones, loaded from a Google server) and change the link style when hovering with the mouse. We are not going to learn about these properties, but you are welcomed to explore them in example-02-10.html, which gives the result shown on Figure 2.12.
FIGURE 2.12: example-02-10.html (Click to view this example on its own)
Finally, we are missing the web map itself which the title and description refer to. The example-02-11.html file adds a web map in the background. If you inspect the source code for this page you will a <script> element. This loads a JavaScript code from a separate file map.js. The script acts on the <div> element that has id="map", replacing it with an interactive map -
<script src="map.js"></script>The content of the script file map.js is not important for now, as we will learn all about it in Chapter 6.
Note that in example-02-11.html both the map title and the map description are associated with the one more CSS declaration, as follows, to make sure they are shown above the map.
z-index: 800;
FIGURE 2.13: example-02-11.html (Click to view this example on its own)
2.10 Exercise
- Think about the data and concept that you would like to use for a web mapping project of your own
- Modify the content of the map description from the last example to describe your planned map
FIGURE 2.3 - Debugging CSS (Source)