Chapter 1 HTML
Last updated: 2018-11-11 20:44:58
1.1 How do people access the web?
1.1.1 Browsers
People access the web using software known as a web browser. Popular examples of web browsers are listed in Table 1.1.
| Browser | URL |
|---|---|
| Chrome | https://www.google.com/chrome/browser/desktop/index.html |
| Internet Explorer | https://www.microsoft.com/en-us/download/internet-explorer.aspx |
| Edge | https://www.microsoft.com/en-us/windows/microsoft-edge |
| Firefox | https://www.mozilla.org/en-US/firefox/ |
| Safari | https://www.apple.com/lae/safari/ |
In order to view a web page, users might -
- Type a URL into the address bar of the browser
- Follow a link from another site
- Use a bookmark
1.1.2 Web servers
When you ask your browser for a web page, typing a URL such as https://www.google.com in the address bar, the request is sent across the internet to a special computer known as a web server which hosts the website. Web servers are special computers that are constantly connected to the internet, and are optimized to send web pages out to people who request them. Your computer, the client, receives the file and renders the web page you ultimately see on screen. We will clarify those two terms with more detail in Chapter 5.
When you are looking at a website, it is most likely that your browser will be receiving HTML and CSS documents from the web server that hosts the site. The web browser interprets the HTML and CSS code to create the page that you see. We will learn about HTML in Chapter 1 (this Chapter) and about CSS in Chapter 2.
Most web pages also send JavaScript code to your browser to make the page interactive. The browser runs the JavaScript code, on page load and/or later on, while the user interacts with the web page. The JavaScript code can modify the content of the page. We will introduce JavaScript in Chapters 3 and 4.
1.2 Web pages
At the most basic level, a web page is a text document containing HTML code.
For example -
- Open the
example-01-01.htmlfrom the book materials in Chrome. This is a minimal HTML document, as shown on the left pane of Figure 1.1 - Press Ctrl+U. This will open a new tab appear. The new tab contains the source code that was used to create the page, as shown on the right pane of Figure 1.1

FIGURE 1.1: HTML document (left) and its source code (right)
The examples for this book are listed in Appendix B. They can be viewed and downloaded in the online version (Section 0.7) of this book.
Here is the source code you should see for example-01-01.html -
<!DOCTYPE html>
<html>
    <head>
        <title>A minimal web page</title>
    </head>
    <body>
        <h1>This is the main heading</h1>
        <p>This is a paragraph.</p>
    </body>
</html>
The source code comprises the contents of an HTML document. The source code is sent to the browser, then processed to produce the display shown on Figure 1.2.
FIGURE 1.2: example-01-01.html (Click to view this example on its own)
This is a minimal web page, built using a single (short) HTML file. As we shall see throughout the book, the documents for building more complicated web pages also include CSS and/or JavaScript files. Each of them has a different role when building the web page you see in the browser -
- HTML files (
.html) - Determine contents - CSS files (
.css) - Determine style - JavaScript files (
.js) - Determine interactive behavior
1.3 Text editors
HTML, CSS and JavaScript code, like any other computer code, is plain text stored in text files. To edit them, you need to use a plain text editor. The simplest option is Notepad++. There are also mode advanced editors such as Sublime Text. The more advanced editors contain more features - such as shortcuts, highlighting matching brackets, etc. You can use any plain text editor you prefer.
- Open a plain text editor such as Notepad++
- Copy the above “minimal HTML document” code section and paste it into the text document
- Click Save As… and save the document to a file named
index.html. Make sure you choose Save as type… as Hyper Text Markup Language (HTML) file. Figure 1.3 shows what the results should look like in case you are using the Notepad++ editor- Go to the directory where you saved the file, and double click on the file
- The browser should now open and display the minimal web page
- Go back to the text editor, locate the text
"This is a paragraph.", replace it with some other text and save the document- Refresh the browser - you should see the new content on the web page!
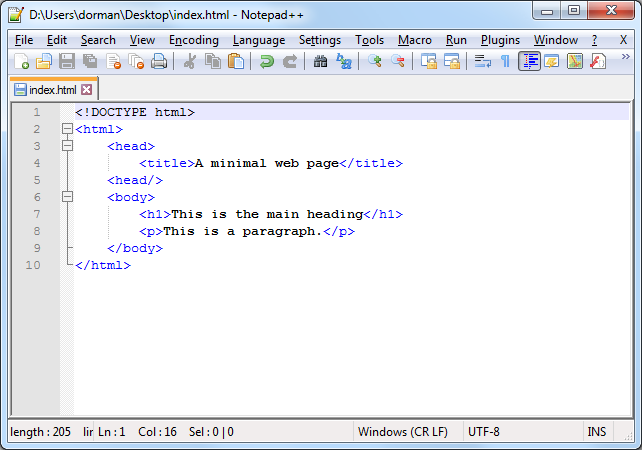
FIGURE 1.3: HTML document source code viewed in a text editor
1.4 What is HTML?
1.4.1 Overview
HyperText Markup Language (HTML) is the language that describes the contents of web pages. Most web pages today are composed of more than just HTML, but simple web pages - such as the ones we create in this Chapter - can be made with HTML alone.
HTML code consists of HTML elements. An HTML element contains text and/or other elements. This makes HTML code hierarchical. An HTML element consists of a start tag, followed by the element content, followed by an end tag. A start tag is of the form <elementName> and an end tag is of the form </elementName>. The start and end tags contain the element name.
The following example shows a title element; the start tag is <title>, the end tag is </title>, and the content is the text Web Mapping.
<title>Web Mapping</title>Table 1.2 summarizes these definitions.
| Component | Example |
|---|---|
| HTML element |
<title>Web Mapping</title>
|
| Start tag |
<title> Web Mapping</title>
|
| Element name |
< title >Web Mapping</title>
|
| Element contents |
<title> Web Mapping </title>
|
| End tag |
<title>Web Mapping </title>
|
Some elements are empty, which means that they consist of only a start tag, with no content and no end tag. The following code shows an hr element, which is an example of an empty element.
<hr>An element may have one or more attributes. Attributes appear inside the start tag and are of the form attributeName="attributeValue". The code below shows an example of an img element, with an attribute called src. The value of the attribute in this example is "images/leaflet.png".
<img src="images/leaflet.png">Table 1.3 summarizes these definitions.
| Component | Example |
|---|---|
| HTML element |
<img src=“images/leaflet.png”>
|
| Element name |
< imgsrc=“images/leaflet.png”>
|
| Attribute |
<img src=“images/leaflet.png” >
|
| Attribute name |
<imgsrc =“images/leaflet.png”>
|
| Attribute value |
<img src= “images/leaflet.png” >
|
Note that there can be more than one attribute for an element, in which case they are separated by spaces. For example -
<img src="images/leaflet.png" width="300px">There is a fixed set of valid HTML elements (see below) and each element has its own set of possible attributes.
In terms of the entire document structure, an HTML document must include a DOCTYPE declaration and a single <html> element. Within the <html> element there must be a single <head> element and a single <body> element. Within the <head> element there must be a <title> element. This leads to the minimal HTML code shown below -
<!DOCTYPE html>
<html>
    <head>
        <title></title>
    </head>
    <body>
    </body>
</html>
Technically, everything except for the DOCTYPE declaration is optional since in most cases it can be automatically completed by the browser. For clarity, most websites still include the above minimal structure, and so will we.
1.4.2 HTML comments
It is good practice to keep comments in our code, so that we can remember our intentions later on, or so that others can understand them more easily.
In HTML, comments are written as follows -
<!-- This is a comment -->Anything between the start <!-- and end -->, including HTML tags, is completely ignored by the computer. It is only there to pass messages to a human reader of the code.
1.4.3 Block vs. Inline
The primary purpose of HTML tags is to specify the structure of a web page. The type of elements being used, and their ordering, determines the structure of the page.
The content of an element may be other elements or plain text. As we will see shortly, there are different types of elements, and there are rules regarding the elements that another element can include.
While learning about the various HTML elements, it is important to note that HTML elements may be divided into two general types of behaviors -
- Block-level elements
- Inline elements
A block-level element is like a paragraph (Figure 1.4). Block elements always start on a new line in the browser window.
Examples of block elements include -
- Headings (
<h1>) - Paragraphs (
<p>) - Bullet-point lists (
<ul>) - Numbered lists (
<li>)
It is helpful to imagine block elements as horizontal boxes. Box width is determined by the width of the browser window, so that the box fills the entire available space. Box height is determined by the amount of content. (This is the default behavior; in Chapter 2 we will see that the height and width can be modified with CSS).
An inline element is like a word within a paragraph. It is a small component that is arranged with other components inside a container. Inline elements appear on the same line as their neighboring elements.
Examples of inline elements include -
- Links (
<a>) - Bold text (
<b>) - Italic text (
<i>) - Images (
<img>)
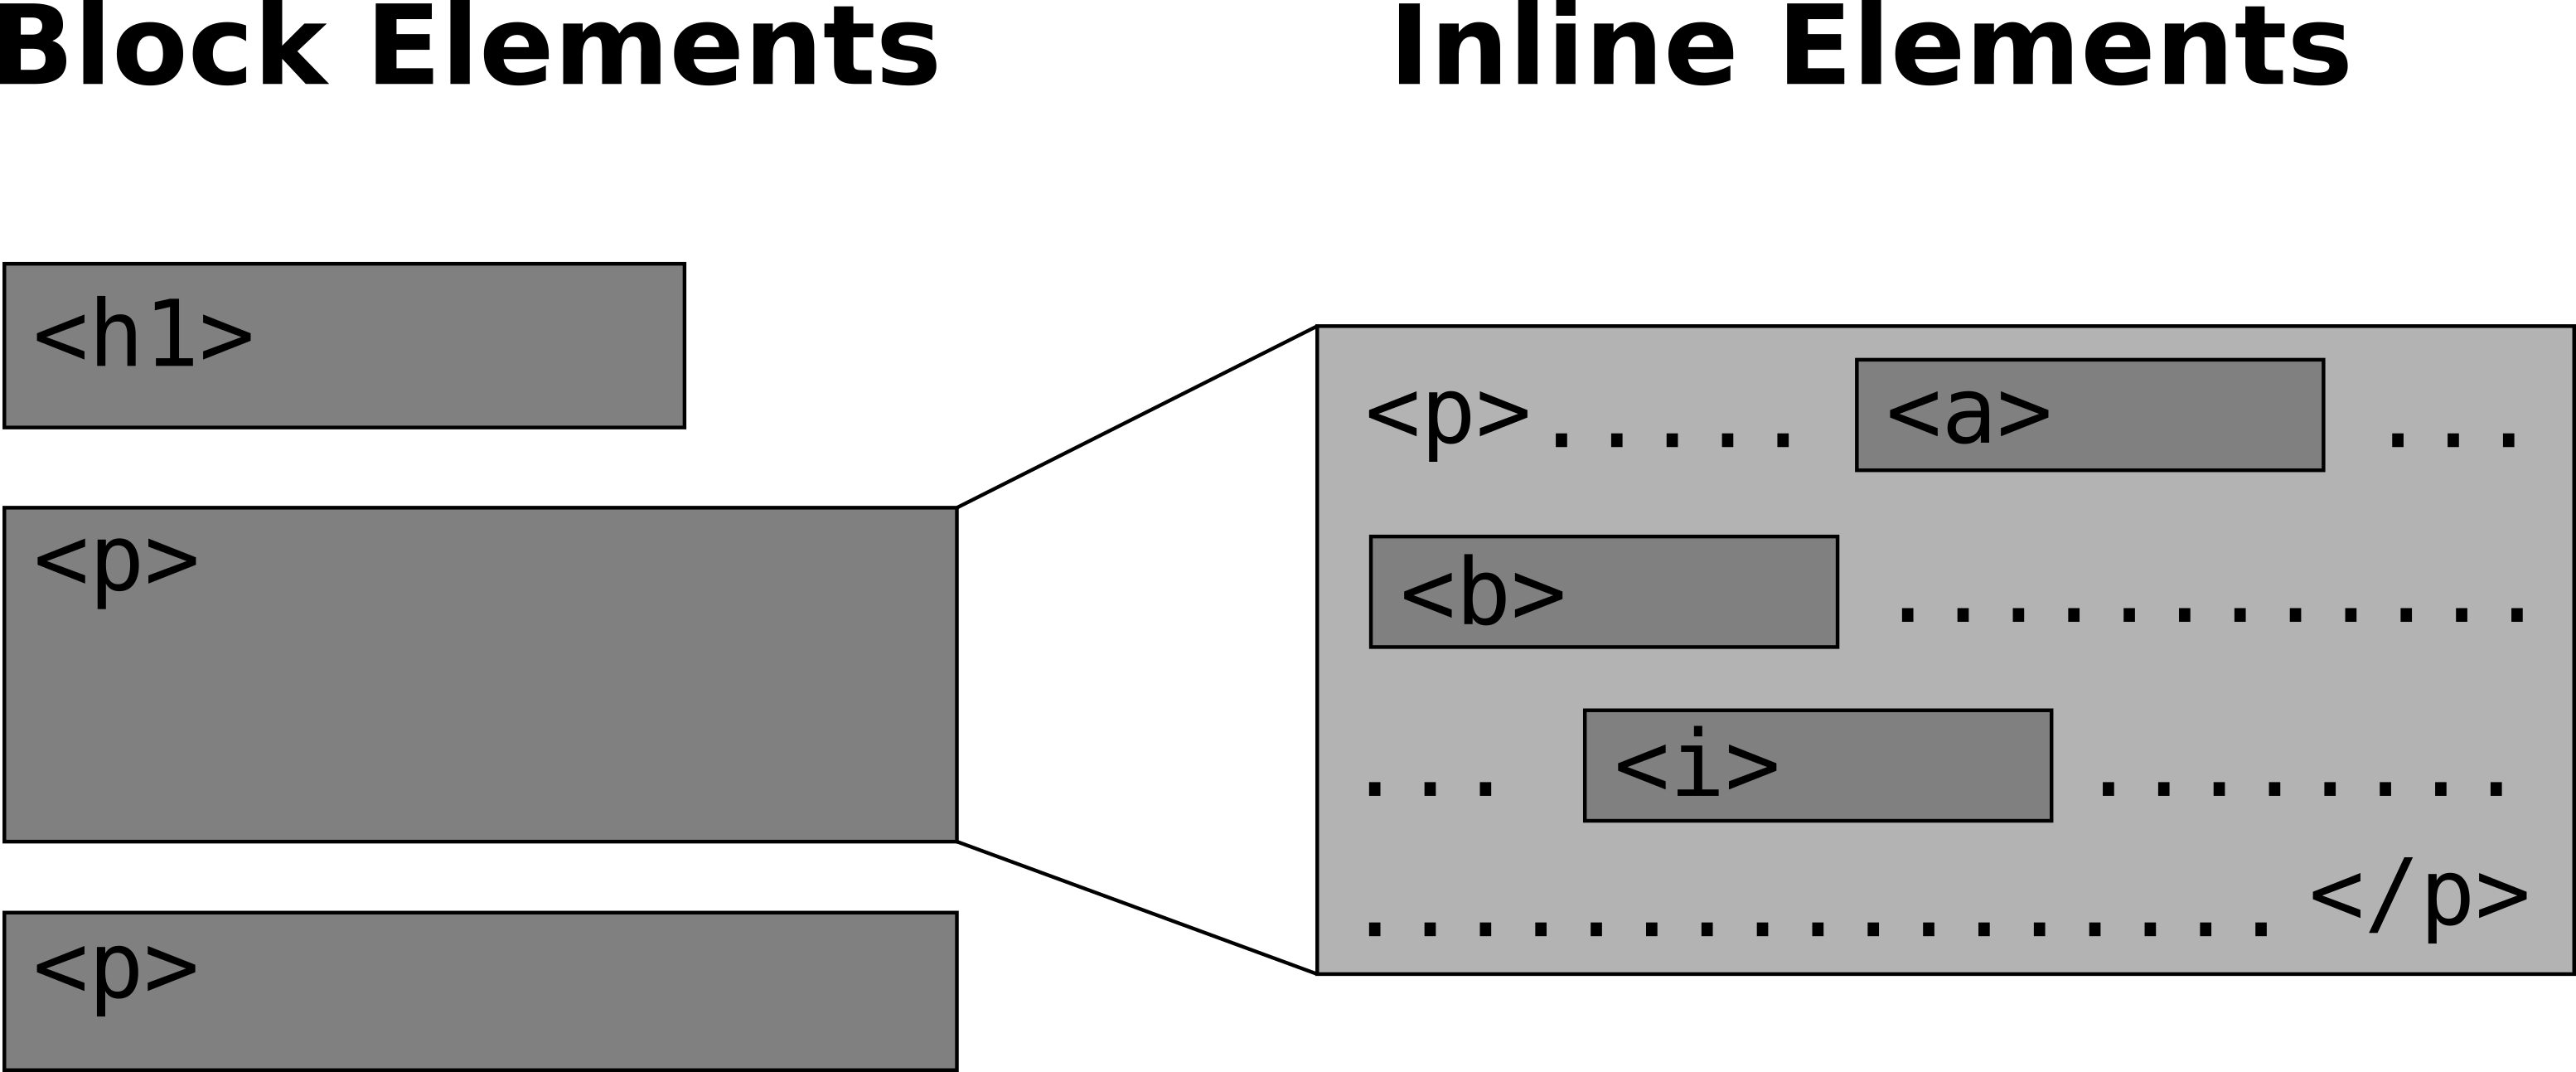
FIGURE 1.4: Block vs. Inline HTML elements
1.5 Common HTML elements
This section briefly describes the important behavior, attributes, and rules for each of the common HTML elements. We will use most of these elements throughout the book, so it is important to be familiar with them from the start. You don’t need to remember how to use each element - you can always come back to this section later on.
Keep in mind that these are just the most common elements. HTML defines a lot of other element types which we will not use in the book. A list of HTML elements can be found in various online resources, such as the HTML elements reference by Mozilla.
HTML elements can be divided into several types according to their role, as shown in Table 1.4.
| Role | Element | Description |
|---|---|---|
| Document structure | <!DOCTYPE> |
Document type declaration |
<html> |
Document | |
<head> |
General information | |
<body> |
Content | |
| General information | <title> |
Title |
<meta> |
Metadata | |
<link> |
External CSS code | |
<style> |
Embedded CSS code | |
<script> |
JavaScript code | |
| Content | <h1>, <h2>, …, <h6> |
Headings |
<p> |
Paragraphs | |
<b>, <i>, <sup>, <sub>, <pre> |
Font types | |
<br>, <hr> |
Spacing | |
<ul>, <ol>, <li> |
Lists | |
<a> |
Links | |
<img> |
Images | |
<table>, <th>, <tr>, <td> |
Tables | |
<div>, <span> |
Grouping | |
<input>, <select>, <option> |
User input |
1.5.1 Structure
The <!DOCTYPE> declaration specifies the document HTML version the document is written in. It is followed by the <html>, <body> and <head> elements, which determine the top level division of the HTML document into two components: general information about the page (inside the <head>) and the actual content (inside the <body>).
1.5.1.1 <!DOCTYPE>
The <!DOCTYPE> declaration must be the first thing in the HTML document, before the <html> tag.
The <!DOCTYPE> declaration is in fact not an HTML tag. It is an instruction to the browser, telling it what version of HTML the page is written in. In this book we will use the following declaration, which specifies we are using the HTML5 specification -
<!DOCTYPE html>1.5.1.2 <html>
The opening <html> tag indicates that anything between it and a closing </html> tag is HTML code.
The <html> element must contain exactly one <head> element followed by exactly one <body> element.
1.5.1.3 <head>
The <head> element contains information about the page, rather than information that is shown within the main part of the browser window.
1.5.1.4 <body>
Everything inside the <body> element is shown inside the browser window. This is where page content is specified.
Combining the <!DOCTYPE> declaration and the three structural HTML elements we get the following “template” of an HTML page -
<!DOCTYPE html>
<html>
    <head>
        (...General information goes here...)
    </head>
    <body>
        (...Page content goes here...)
    </body>
</html>
The other elements we will learn about appear within the <head> or within <body> element. The <head> element commonly contains the following elements -
<style>and<link>elements for loading CSS code<script>elements for loading JavaScript code<title>for specifying page title<meta>elements for specifying page metadata
The <body> element contains mostly elements related to content, such as paragraphs (<p>), lists (<ol>), images (<img>), and so on. In addition, the <body> can also contain <script> elements for JavaScript code. Thus scripts can be placed in the <body>, or in the <head> section of an HTML document, or in both.
The following Sections 1.5.2 and 1.5.3 provide more details on the five elements which commonly occur in the <head> element. The other sections 1.5.4 to 1.5.12 describe elements that are found in the <body> element.
1.5.2 Title and metadata
1.5.2.1 <title>
The contents of the <title> element are either shown in the top of the browser window, above where you usually type in the URL of the page you want to visit, or on the tab for that page.
The <title> element must be within the <head> element and must only contain text.
For example -
<title>Introduction to Web Mapping</title>
- Open any web page in the Chrome browser
- Press Ctrl+U to open the source code
- Try to locate the
<title>element, and compare its contents with the title shown on the browser window
1.5.2.2 <meta>
The <meta> element contains information about the web page, or its metadata. The <meta> element is an empty element. It typically uses the name and content attributes to carry the metadata, or the charset attribute to specify character encoding for the document.
<meta> elements are typically used to specify page description, keywords, author of the document, last modified date, and other metadata.
In the following example, there are several <meta> elements in the <head>, specifying different metadata items -
<head>
    <meta charset="UTF-8">
    <meta name="description" content="Free Web tutorials">
    <meta name="keywords" content="HTML,CSS,XML,JavaScript">
    <meta name="author" content="John Doe">
    <meta
        name="viewport"
        content="width=device-width, initial-scale=1.0">
</head>
Later on in the book we will use the charset attribute to specify the character encoding of the HTML document. For example -
<head>
    <meta charset="UTF-8">
</head>
1.5.3 Styling and Scripts
1.5.3.1 <style>
<style> elements are used to specify embedded CSS, which we will learn about in Section 2.6.2.
The contents of the style element is CSS code as text contents. Here is an example of a <style> element -
<style>
    p {
        font-style: italic;
    }
</style>
1.5.3.2 <link>
<link> elements refer to external CSS, which we will learn more about in Section 2.6.3.
This is an empty element that must reside in the <head> element. Its important attributes are -
rel- Should have the value"stylesheet"href- Specifies the location of a file containing CSS codetype- Should have the value"text/css"
An example of a link element is shown below -
<link rel="stylesheet" href="style.css" type="text/css">1.5.3.3 <script>
<script> elements are used to load JavaScript code, which we will come back to in Chapter 4.
The <script> element may contain an src attribute which specifies the location of a file containing JavaScript code -
<script src="jquery.js"></script>Alternatively, it may contain JavaScript code as text contents -
<script>
    function hello() {
        document
            .getElementById("demo")
            .innerHTML = "Hello JavaScript!";
    };
    document
        .getElementById("change_text")
        .addEventListener("click", hello);
</script>
1.5.4 Headings and paragraphs
1.5.4.1 <h1>, <h2>, <h3>, <h4>, <h5>, <h6>
These are block-level elements that denote that the contents are a section heading.
For example, the following code defines a second-level heading -
<h2>This is a level-2 heading!</h2>1.5.4.2 <p>
This is a block-level element defining a paragraph. Note that the browser automatically decides where to break lines inside the paragraph.
For example, the following code defines a paragraph -
<p>This is a paragraph!</p>1.5.5 Font formatting
Some characteristics of font formatting can be modified using HTML, using elements such as <b>, <i>, <sup>, <sub> and <pre> as described below.
1.5.5.1 <b>
Text within the <b> element appears bold.
For example, the following HTML code -
This text <b>is bold</b>.Renders the “is bold” part in bold font.
1.5.5.2 <i>
Text within the <i> element appears italic.
For example, the following HTML code -
This text <i>is italic</i>.Renders the “is italic” part in italic font.
1.5.5.3 <sup>
Text within the <sup> element appear superscript.
For example, the following HTML code -
E=MC<sup>2</sup>Appears in the browser as -
E=MC2
1.5.5.4 <sub>
Text within the <sub> element appear subscript.
For example, the following HTML code -
The concentration of CO<sub>2</sub> is increasing.Appears in the browser as -
The concentration of CO2 is increasing.
1.5.5.5 <pre>
The <pre> element (preformatted text) is a block-level element that displays any text content exactly as it appears in the source code. This is contrary to the usual behavior, where the browser ignores multiple spaces and line breaks (Section 1.5.6 below).
The <pre> element is useful for displaying computer code or computer output.
For example, the following HTML code -
<pre>
Text in a pre element
is displayed in a fixed-width
font, and it preserves
both      spaces and
line breaks
</pre>
Is displayed in the browser as is, with the given spaces and line breaks -
Text in a pre element
is displayed in a fixed-width
font, and it preserves
both      spaces and
line breaks
1.5.6 Spacing
When the browser comes across two or more spaces next to each other, it only displays one space. Similarly, if it comes across a line break, it treats it as a single space too. This is known as white-space-collapsing.
Check out the following HTML code -
<!DOCTYPE html>
<html>
    <head>
        <title>White space collapsing</title>
    </head>
    <body>
        <p>The Moon's distance to Earth is 384,402 km</p>
        <p>The Moon's      distance to Earth is 384,402 km</p>
        <p>The Moon's distance to Earth

        is 384,402 km</p>
    </body>
</html>
All three paragraphs appear the same in a web browser, because additional spaces and new-line breaks are ignored, as shown on Figure 1.5.
FIGURE 1.5: example-01-02.html (Click to view this example on its own)
What if we still need to break our text, outside of a <pre> element? The <br> and <hr> elements can be used to do that.
1.5.6.1 <br>
This is an empty element that forces a new line or line-break. The <br> element should be used sparingly. In most cases, text should be broken into lines by the browser to fit the available space.
For example, the following code -
This is a new<br>line.Will split the sentence in two lines with “This is a new” on the first line and “line.” on the second one.
1.5.6.2 <hr>
This is an empty element that produces a horizontal line. For example -
<hr>1.5.7 Lists
1.5.7.1 <ul>, <ol>, and <li>
An unordered list (bullet-point) can be created with the <ul> element. Each list item is placed within a <li> element.
<ul>
  <li>Coffee</li>
  <li>Tea</li>
  <li>Milk</li>
</ul>
An ordered list (numbered) can be created with the <ol> element. Each list item is also placed within a <li> element.
For example -
<ol>
  <li>Coffee</li>
  <li>Tea</li>
  <li>Milk</li>
</ol>
Figure 1.6 shows how these two lists appear in the browser.
FIGURE 1.6: example-01-03.html (Click to view this example on its own)
The <li> and <ol> elements can contain anything, not just text. For example, you can make a list of tables, images, or a list of lists.
Lists can also be styled (using CSS) in different ways, to serve different purposes. For example, navigation bars with tables of contents you usually see on web pages are usually styled lists.
1.5.8 Links
1.5.8.1 <a>
The <a> element creates a link. Links are the defining feature of the web, because they allow you to move from one page to another - enabling the very idea of browsing or surfing.
There are several types of links -
- Links from one website to another website
- Links from one page to another page on the same website
- Links from one part of a web page to another part of the same page
- Links that start up your email program and address a new email to someone
Additionally, there are links which open in the same browser window and links that open in a new browser window.
Links are created using the <a> element. Users can click on anything between the opening <a> tag and the closing </a> tag. This means a link can be composed of text, but also images or other elements. You specify the address of the page you want to link to using the href (hypertext reference) attribute. The value of an href attribute can be -
- An absolute URL - Points to another web site, such as
href="www.ynet.co.il" - A relative URL - Points to a file within a web site, such as
href="index.html"(more on URLs and website file structure in Section 5.5) - Link to an element with a specified
idwithin the page, in which case the browser will scroll to that location, such ashref="#top"(more on IDs in Section 1.6.1 below) - A combination of a URL and location within the page, such as
href="index.html#top"
By default, the link is opened in the same browser window. If you want a link to open in a new window, you can use the target attribute on the opening <a> tag. The value of this attribute should be "_blank".
For example, the following HTML code -
<a href="http://www.bgu.ac.il" target="_blank">BGU</a>Displays the word “BGU” as a link - usually in blue and underlined font. Clicking on the word navigates to http://www.bgu.ac.il.
- Edit either one of the above examples by inserting the above
<a>element into the HTML<body>- Refresh the page. You should see a functional link to the http://www.bgu.ac.il page
1.5.9 Images
1.5.9.1 <img>
The <img> element adds an image to the web page. This is an empty, inline element, which means that images are treated like words in a sentence.
The most important attribute is src, to specify the file containing the image. The src may be a URL, i.e., an image anywhere on the web. We can also set image height and/or width using the height and width attributes, respectively.
For example, the HTML document contains a text paragraph and an image -
<!DOCTYPE html>
<html>
    <head>
        <title>Images</title>
    </head>
    <body>
        <p>This is the logo of the Leaflet JavaScript library</p>
        <img src="images/leaflet.png" width="300px">
    </body>
</html>
The result is shown on Figure 1.7.
FIGURE 1.7: example-01-04.html (Click to view this example on its own)
Note that for this code to work, a PNG image named leaflet.png need to exist. Moreover, the image placement needs to correspond to the specified file path images/leaflet.png, which means that the leaflet.png file is in the images folder, inside the same directory as the index.html file. Don’t worry if this is not clear: we will learn about specifying file paths in Section 5.5.
It should be noted that the src attribute does not necessarily point to a local file. It can also point to images on other websites, using a URL. In either case, the browser will load the image from the specified location.
- Edit the previous example by replacing the file
srcfile path with the URL https://leafletjs.com/docs/images/logo.png- Refresh the page. The image should now be loaded from the https://leafletjs.com website instead of from a local file
1.5.10 Tables
1.5.10.1 <table>, <th>, <tr>, and <td>
A table is defined using the <table> element, which contains one or more <tr> (table row) elements, each of which contains one or more <td> (table data) elements. The <td> element will contain the contents of a single table cell.
The first table row can be defined with <th> (table heading) elements instead of <tr> elements. The heading is shown in bold font by default.
Unless explicit dimensions are given, the table rows and columns are automatically sized to fit their contents.
The following HTML code creates a table with three rows and three columns -
<table>
    <tr>
        <th>Library</th>
        <th>Version</th>
        <th>Released</th>
    </tr>
    <tr>
        <td>jQuery</td>
        <td>3.3.1</td>
        <td>2018-01-20</td>
    </tr>
    <tr>
        <td>Leaflet</td>
        <td>1.3.3</td>
        <td>2018-07-18</td>
    </tr>
    <tr>
        <td>Turf.js</td>
        <td>5.1.6</td>
        <td>2017-12-10</td>
    </tr>
</table>
The table appears in the browser as shown on Figure 1.8. It may not look impressive, but keep in mind that table styling, such as alignment, border size and color, etc., can be customized using CSS which we learn about in Chapter 2. There are also several other element types that can go into the <table> element to make more complex tables.
FIGURE 1.8: example-01-05.html (Click to view this example on its own)
1.5.11 Grouping
The <div> and <span> elements are generic block-level and inline elements (respectively), which are used to group other elements and content, usually to associate each group with CSS styling rules (Chapter 2).
1.5.11.1 <div>
The <div> element allows you to group a set of elements together in one block-level box.
For example, you might create a <div> element to contain all of the elements for the header of your site (the logo and the navigation), or you might create a <div> element to contain comments from visitors.
In a browser, the contents of the <div> element will start on a new line, but other than this it will make no difference to the presentation of the page. Using an id or class attribute on the <div> element (see Section 1.6 below), however, means that you can create styling rules (with CSS) to indicate how much space the <div> element should occupy on the screen, where it should be placed, change the appearance of all the elements contained within it, and so on.
Another use case of the <div> element is to create an empty “container”, to be populated with content on page load using JavaScript. We will use this technique when creating web maps with Leaflet (Section 6.5.3).
1.5.11.2 <span>
The <span> element acts like an inline equivalent of the <div> element. It is used to either -
- Contain a section of text where there is no other suitable element to differentiate it from its surrounding text
- Contain a number of inline elements
Again, the most common reason why people use <span> elements is so that they can control the appearance of the content of these elements using CSS.
1.5.12 Input elements
HTML supports several types of input elements. Input elements are used to collect information from the user and thus make the web page interactive. Buttons, check-boxes, sliders and text inputs are all examples of input elements. The search box on https://www.google.com is perhaps the most well-known example of a text input element.
Input elements can be added with the <input> tag. The <input> element has several important attributes -
type- The type of inputname- The identifier that is sent to the server when you submit the formvalue- The initial value in text and numeric inputs, or the text appearing on a button
Dropdown menu input is a special case since it is defined with the <select> and <option> elements rather than the <input> element (see Section @ref (dropdown-lists) below).
Input elements are usually grouped inside a <form> element. This has advantages for handling multiple inputs as a single unit. Through most of the book we will use simple, individual inputs, without enclosing them in a <form>. We will come back to an example with a <form> element in Section 13.4.
Common input types are summarized in Table 1.5 and described in more detain in Sections 1.5.12.1 to 1.5.12.8 below.
| Input type | Usage |
|---|---|
| Numeric input | <input type="number"> |
| Range input | <input type="range"> |
| Text input | <input type="text"> |
| Text area | <textarea></textarea> |
| Radio buttons | <input type="radio"> |
| Check boxes | <input type="checkbox"> |
| Dropdown lists | <select><option></option></select> |
| Buttons | <input type="button"> |
Note that there are many other possible input types which we will not use in this book, including input for colors, dates, etc.
1.5.12.1 Numeric input
A numeric <input> element is used to get numeric input through typing or clicking the up/down buttons.
A numeric input is defined using an <input> element with a type="number" attribute. Other important attributes are min and max, specifying the valid range.
<input type="number" name="num" value="5" min="0" max="100">The name attribute identifies the form control, and is sent along with the entered information when submitting a form to the server.
The result is shown on Figure 1.9. Note that the code for example-01-06.html includes CSS styling rules for arranging the elements in three columns, which we learn about in Chapter 2.
FIGURE 1.9: example-01-06.html (Click to view this example on its own)
1.5.12.2 Range input
A range <input> element is used to select numeric values with a slider.
A range input is defined using type="range". The purpose of the value, min and max attributes is to specify the initial, minimal and maximal values, respectively, like in the numeric input.
<input type="range" name="points" value="5" min="0" max="100">The result is shown on Figure 1.9.
1.5.12.3 Text input
A text <input> is used for typing plain text.
A text input is defined using type="text" -
First name:<br>
<input type="text" name="firstname"><br>
Last name:<br>
<input type="text" name="lastname">
The result is shown on Figure 1.9.
1.5.12.4 Text area
A text area input is used for typing plain text, just like text input, but intended for multi-line rather than single-line text input.
A text input is defined using the <textarea> element -
<textarea name="mytext"></textarea>The result is shown on Figure 1.9.
1.5.12.6 Check boxes
Check boxed are used to select one or more (or none) of several options.
Each check box is defined with a separate <input> element using type="checkbox".
<input type="checkbox" name="vehicle1" value="Bike">
    I have a bike<br>
<input type="checkbox" name="vehicle2" value="Car">
    I have a car<br>
The result is shown on Figure 1.9.
1.5.12.7 Dropdown lists
Dropdown lists are used to select one option from a list. The list is hidden from view until clicked, which is useful when we have a long list of options.
The dropdown list is initiated using the <select> element. Inside the <select> element, each option is defined with a separate <option> element.
For example -
<select name="cars">
    <option value="volvo">Volvo</option>
    <option value="suzuki">Suzuki</option>
    <option value="fiat">Fiat</option>
    <option value="audi">Audi</option>
</select>
The result is shown on Figure 1.9.
Note that radio buttons, check boxes and dropdown lists all have a value attribute. This attribute plays the role of an ID, identifying the selected input option when sending the data to the server. The value does not necessarily have to match with the text content we see on screen when interacting with the input element in the browser. For example, in the above HTML code the first <option> has value="volvo" which is used to identify the option when sending data to a server, while the text content is "Volvo" (capital V) which the user sees on screen.
1.6 id, class and style attributes
So far we have seen specific attributes for different elements. For example, the src attribute is specific to <img> elements and the href attribute is specific to <a> elements.
There are also three important non-specific attributes, which can appear in any element -
id- Unique identifierclass- Non-unique identifierstyle- Inline CSS
1.6.1 id
Every HTML element can carry the id attribute. It is used to uniquely identify that element from other elements on the page. Its value should start with a letter or an underscore, not a number or any other character. It is important that no two elements on the same page have the same value for their id attributes - otherwise the value is no longer unique.
For example, the following page has three <p> elements with id attributes. Note that the values of the id attribute - "intro", "middle" and "summary" - are different from each other.
<!DOCTYPE html>
<html>
    <head>
        <title>A Minimal HTML Document</title>
    </head>
    <body>
        <h1>Heading</h2>
        <p id="intro">The 1st paragraph is an overview</p>
        <p id="middle">The 2nd paragraph gives more details</p>
        <p id="summary">The 3rd paragraph is a summary</p>
    </body>
</html>
As we will see when talking about CSS Chapter 2, giving an element a unique id allows you to style it differently than any other instance of the same element on the page. For example, you might want to assign one paragraph within the page a different color than all of the other paragraphs. When we go on to learn about JavaScript and interactive behavior in Chapter 4, we will also use id attributes to allow our scripts to affect particular elements on the page.
1.6.2 class
Every HTML element can also carry a class attribute. Sometimes, rather than uniquely identifying one element within a document, you will want a way to identify a group of elements as being different from the other elements on the page. For example, you might have some paragraphs of text that contain information that is more important than others and want to distinguish these elements, or you might want to differentiate between links that point to other pages on your own site and links that point to external sites.
To mark multiple elements as belonging to one group we can use the class attribute. The value of the class attribute identifies the group those elements belong to. In the following example, the first and second <p> elements have the class attribute value of "important".
<!DOCTYPE html>
<html>
    <head>
        <title>A Minimal HTML Document</title>
    </head>
    <body>
        <p class="important">The 1st paragraph is an overview</p>
        <p>The 2nd paragraph gives more details</p>
        <p class="important">The 3rd paragraph is a summary</p>
    </body>
</html>
Just like an id, the class attribute is commonly used for styling, or interacting with, a group of elements on the page.
1.6.3 style
All elements may also have a style attribute, which allows inline CSS rules to be specified within the element’s start tag. We will talk about inline CSS in Section 2.6.1.
1.7 Code layout
When writing code, it is useful to keep a uniform code layout. For example, we can use tabs to distinguish content that is inside another element, thus highlighting the hierarchical structure of code.
The following two HTML documents are the same as far as the computer is concerned, i.e. they are displayed exactly the same way in the browser. However, the second HTML document is much more readable to humans thanks to the facts that -
- Each elements starts on a new line
- Internal elements are indented with tabs.
<!DOCTYPE html><html><head><title>A Minimal HTML
Document</title></head><body>
The content goes here!</body>
<!DOCTYPE html>
<html>
<head>
<title>A Minimal HTML Document</title>
</head>
<body>
The content goes here!
</body>
</html>1.8 Inspecting elements
When looking at a simple page (such as the ones we created in this Chapter), it is easy to locate the HTML code responsible for creating a given element we see in the browser. However, as the HTML code becomes longer and more complex it may be more difficult to make this association.
Luckily, browsers have a built-in feature for locating HTML code associated with any element you see on screen.
For example -
- Open the
example-01-01.htmlexample in Chrome - Press Ctrl+Shift+I or F12.
The screen should now be split. The left pane still shows the web page. The right pane shows the Chrome Developer Tools. The developer tools are a set of web authoring and debugging tools built into Google Chrome. They provide web developers access into the internals of the browser and the web page being displayed.
- Press Ctrl+Shift+C
This toggles the Inspect Element mode. (It also opens the developer tools in the Inspect Element mode if they are not already open.)
In the Inspect Element mode (Figure 1.10) you can hover on different parts of the page with the mouse pointer. The relevant elements are highlighted, and their name is shown. Clicking on an element shows the relevant part of the page source code.
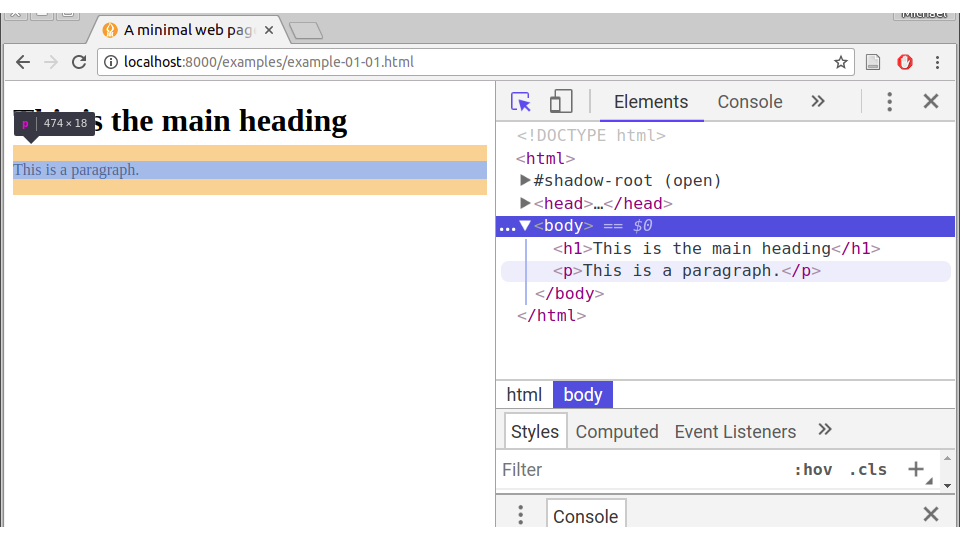
FIGURE 1.10: Using the Inspect Element tool in Chrome
Remember we mentioned that every HTML element can be thought of as a horizontal box, where (by default) height is determined by amount of content and width is set to maximum of browser width? This becomes evident when the Inspect Element tool highlights those boxes (Figure 1.10).
1.9 Exercise
- Edit the minimal HTML document
example-01-01.htmlto experiment with the HTML element types we learned in this Chapter- Add a title
- Add a paragraph with 2-3 sentences about a subject you are interested in
- Use the appropriate tags to format some of the words in italic or bold font
- Use the
<a>tag to add a link to another web page- Add a list, with two levels, i.e. where each list item is also a list
- Add images which are loaded from another location on the internet, such as from Flickr